资料
Spring MVC — @RequestMapping原理讲解-1 - 陶庭开 - 博客园 (cnblogs.com)
SpringBoot之@Controller和@RequestMapping的实现原理_51CTO博客_controller requestmapping
Spring MVC源码解析——HandlerMapping(处理器映射器)_springmvc handlermapping-CSDN博客
【精选】【spring】DispatcherServlet详解_spring dispatcherservlet_云川之下的博客-CSDN博客
探究SpringWeb对于请求的处理过程 - 先知社区 (aliyun.com)
奇安信攻防社区-浅谈SpringWeb请求解析过程 (butian.net)
https://mp.weixin.qq.com/s/aWTcq3690F3CmGGo4A-a0w
疑问区间:
- 在inerceptor中的prehandle中使用request.getRequestURI();进行获取url鉴权处理,这个和后续路由分发是否是同一个url,也就是如果里面包含“../”这种并不会进行绕过。因为找不到具体路由;
- 路由解析那里解释按照内存马的思路不是很完善,需要补充;
0x00前言
DispatcherServlet
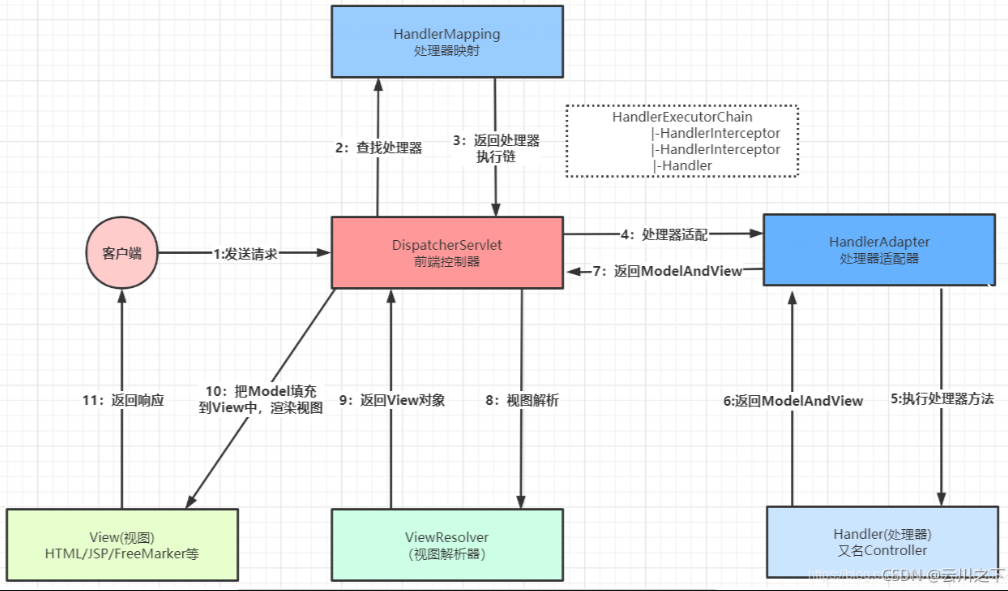
在SpringMvc中,DispatcherServlet是前端控制器设计模式的实现,提供Spring Web MVC的集中访问点,而且负责职责的分派。主要职责如下:
-
前端控制器模式:在Spring MVC框架中,DispatcherServlet实现了前端控制器设计模式。这个模式的主要思想是提供一个中心点,所有的请求将先到达这个中心点,然后由它进行分发。这样可以帮助我们将请求处理流程中的公共逻辑集中处理,从而提高了代码的可维护性。
-
请求分发:当DispatcherServlet接收到一个HTTP请求后,它会把请求分发给相应的处理器。这个分发的过程主要依赖HandlerMapping组件。HandlerMapping根据请求的URL找到对应的Controller。将请求映射到处理器(返回一个HandlerExecutionChain,它包括一个处理器,多个HandlerIntercept拦截器)
-
处理器适配:找到了正确的处理器之后,DispatcherServlet需要调用这个处理器的方法来处理请求。这个过程由HandlerAdapter负责。HandlerAdapter会调用处理器的适当方法,并将返回值包装成ModelAndView对象。HandlerAdapter支持多种类型的处理器(HandlerExecutionChain中的处理器)
-
视图解析:DispatcherServlet还负责将处理器返回的ModelAndView对象解析为实际的视图。这个过程由ViewResolver完成。视图解析器根据ModelAndView中的视图名和已配置的视图解析器来选择一个合适的视图。
-
执行过程中遇到异常将交给HandlerExecutionResolver来解析;
【精选】【spring】DispatcherServlet详解_spring dispatcherservlet_云川之下的博客-CSDN博客
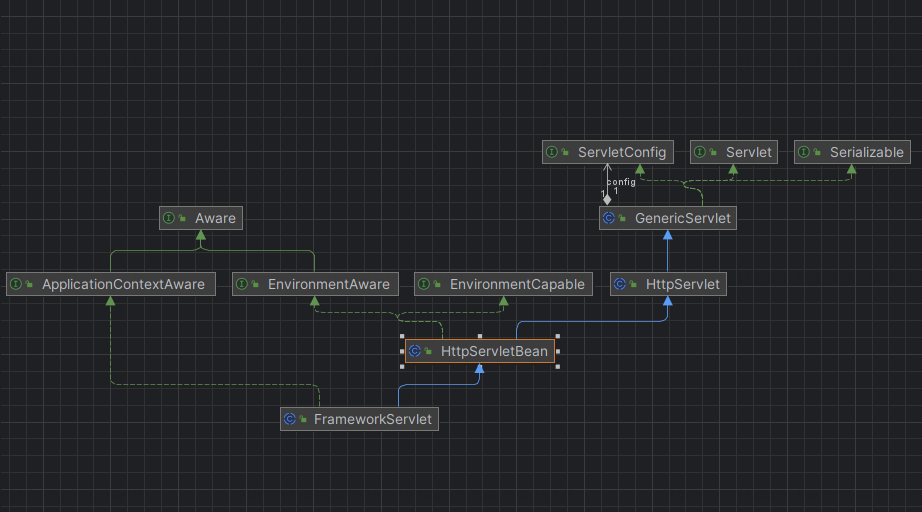
DispatcherServlet类相关结构图
DispatcherServlet本质还是一个Servlet,所以本质上会有初始化和响应请求的方法,遵循init-service-destory;
org.springframework.web.servlet.DispatcherServlet
init初始化
-
DispatcherServlet 的
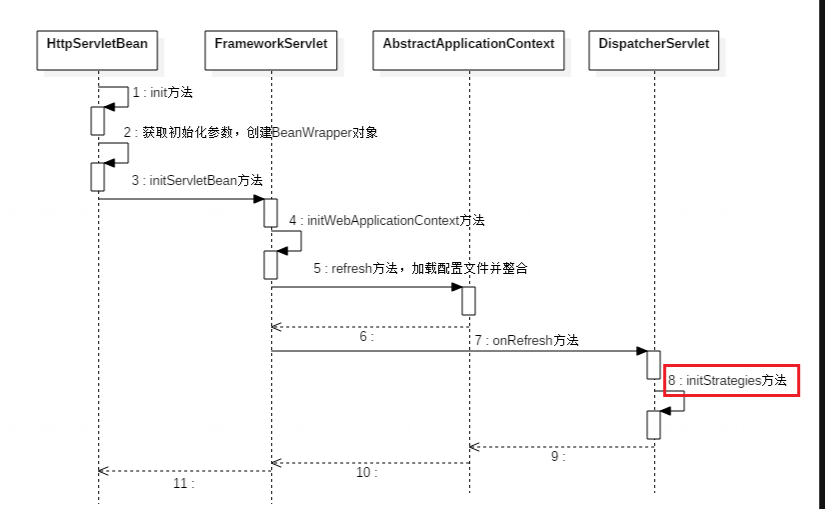
init()方法在其父类 HttpServletBean中实现的,它覆盖了 GenericServlet 的 init() 方法,主要作用是加载 web.xml 中 DispatcherServlet 的 配置,并调用子类的初始化。子类实现的方法initServletBean();org.springframework.web.servlet.HttpServletBean#init
public final void init() throws ServletException {PropertyValues pvs = new ServletConfigPropertyValues(this.getServletConfig(), this.requiredProperties);if (!pvs.isEmpty()) {try {BeanWrapper bw = PropertyAccessorFactory.forBeanPropertyAccess(this);ResourceLoader resourceLoader = new ServletContextResourceLoader(this.getServletContext());bw.registerCustomEditor(Resource.class, new ResourceEditor(resourceLoader, this.getEnvironment()));this.initBeanWrapper(bw);bw.setPropertyValues(pvs, true);} catch (BeansException var4) {if (this.logger.isErrorEnabled()) {this.logger.error("Failed to set bean properties on servlet '" + this.getServletName() + "'", var4);}throw var4;}}this.initServletBean(); }protected void initServletBean() throws ServletException { } -
initServletBean() 这个方法,它是在 FrameworkServlet 类中实现的,主要作用是建立 WebApplicationContext 容器(有时也称上下文),并加载 SpringMVC 配置文件中定义的 Bean 到改容器中,最后将该容器添加到 ServletContext 中;由 DispatcherServlet 实现onRefresh()
org.springframework.web.servlet.FrameworkServlet#initServletBean
protected final void initServletBean() throws ServletException {this.getServletContext().log("Initializing Spring " + this.getClass().getSimpleName() + " '" + this.getServletName() + "'");if (this.logger.isInfoEnabled()) {this.logger.info("Initializing Servlet '" + this.getServletName() + "'");}long startTime = System.currentTimeMillis();try {//初始化 WebApplicationContext (即SpringMVC的IOC容器)this.webApplicationContext = this.initWebApplicationContext();this.initFrameworkServlet();} catch (RuntimeException | ServletException var4) {this.logger.error("Context initialization failed", var4);throw var4;}if (this.logger.isDebugEnabled()) {String value = this.enableLoggingRequestDetails ? "shown which may lead to unsafe logging of potentially sensitive data" : "masked to prevent unsafe logging of potentially sensitive data";this.logger.debug("enableLoggingRequestDetails='" + this.enableLoggingRequestDetails + "': request parameters and headers will be " + value);}if (this.logger.isInfoEnabled()) {this.logger.info("Completed initialization in " + (System.currentTimeMillis() - startTime) + " ms");}}org.springframework.web.servlet.FrameworkServlet#initWebApplicationContext protected WebApplicationContext initWebApplicationContext() {// 获取 ContextLoaderListener 初始化并注册在 ServletContext 中的根容器,即 Spring 的容器WebApplicationContext rootContext = WebApplicationContextUtils.getWebApplicationContext(this.getServletContext());WebApplicationContext wac = null;if (this.webApplicationContext != null) {// 因为 WebApplicationContext 不为空,说明该类在构造时已经将其注入wac = this.webApplicationContext;if (wac instanceof ConfigurableWebApplicationContext) {ConfigurableWebApplicationContext cwac = (ConfigurableWebApplicationContext)wac;if (!cwac.isActive()) {if (cwac.getParent() == null) {// 将 Spring 的容器设为 SpringMVC 容器的父容器cwac.setParent(rootContext);}this.configureAndRefreshWebApplicationContext(cwac);}}}if (wac == null) {// 如果 WebApplicationContext 为空,则进行查找,能找到说明上下文已经在别处初始化。wac = this.findWebApplicationContext();}if (wac == null) {// 如果 WebApplicationContext 仍为空,则以 Spring 的容器为父上下文建立一个新的。wac = this.createWebApplicationContext(rootContext);}if (!this.refreshEventReceived) {//由 DispatcherServlet 实现synchronized(this.onRefreshMonitor) {this.onRefresh(wac);}}if (this.publishContext) {// 发布这个 WebApplicationContext 容器到 ServletContext 中String attrName = this.getServletContextAttributeName();this.getServletContext().setAttribute(attrName, wac);}return wac; } -
通过 onRefresh(ApplicationContext context) 方法回调,进入 DispatcherServlet 类中。onRefresh() 方法,提供 SpringMVC 的初始化;
org.springframework.web.servlet.DispatcherServlet#onRefresh
protected void onRefresh(ApplicationContext context) {this.initStrategies(context); } -
initStrategies()方法完成SpringMVC 的初始化。
org.springframework.web.servlet.DispatcherServlet#initStrategies
protected void initStrategies(ApplicationContext context) {this.initMultipartResolver(context);this.initLocaleResolver(context);this.initThemeResolver(context);this.initHandlerMappings(context);this.initHandlerAdapters(context);this.initHandlerExceptionResolvers(context);this.initRequestToViewNameTranslator(context);this.initViewResolvers(context);this.initFlashMapManager(context);
}
-
initMultipartResolver:初始化MultipartResolver,用于处理文件上传服务,如果有文件上传,那么就会将当前的HttpServletRequest包装成- DefaultMultipartHttpServletRequest,并且将每个上传的内容封装成CommonsMultipartFile对象。需要在dispatcherServlet-servlet.xml中配置文件上传解析器。
-
initLocaleResolver:用于处理应用的国际化问题,本地化解析策略。
-
initThemeResolver:用于定义一个主题。
-
initHandlerMapping:用于定义请求映射关系。
-
initHandlerAdapters:用于根据Handler的类型定义不同的处理规则。
-
initHandlerExceptionResolvers:当Handler处理出错后,会通过此将错误日志记录在log文件中,默认实现类是SimpleMappingExceptionResolver。
-
initRequestToViewNameTranslators:将指定的ViewName按照定义的RequestToViewNameTranslators替换成想要的格式。
-
initViewResolvers:用于将View解析成页面。
-
initFlashMapManager:用于生成FlashMap管理器。
注意:initHandlerMappings() 方法从 SpringMVC 的容器及 Spring 的容器中查找所有的 HandlerMapping 实例,并把它们放入到 handlerMappings 这个 list 中。
这个方法并不是对 HandlerMapping 实例的创建,这里只是查找并放到一个集合中。HandlerMapping 实例化是在之前步骤 WebApplicationContext 容器初始化中,即 SpringMVC 容器初始化的时候创建的。initHandlerMappings()同理;
请求响应
HttpServlet 提供了 doGet()、doPost() 等方法,DispatcherServlet 中这些方法是在其父类 FrameworkServlet 中实现的,代码如下:
org.springframework.web.servlet.FrameworkServlet#doGet
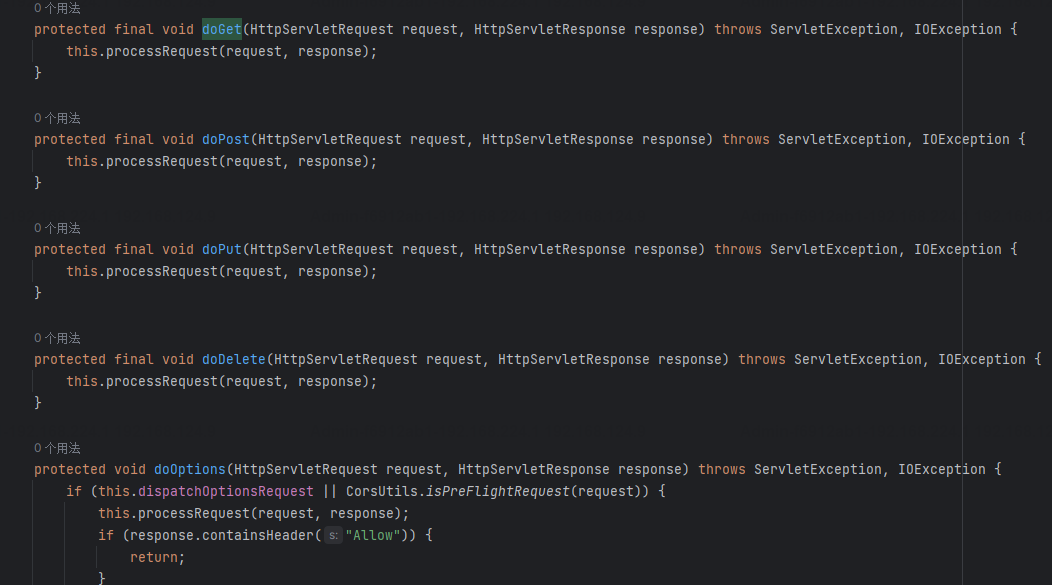
这些方法又都调用了 processRequest() 方法
org.springframework.web.servlet.FrameworkServlet#processRequest
protected final void processRequest(HttpServletRequest request, HttpServletResponse response)throws ServletException, IOException {long startTime = System.currentTimeMillis();Throwable failureCause = null;// 返回与当前线程相关联的 LocaleContextLocaleContext previousLocaleContext = LocaleContextHolder.getLocaleContext();// 根据请求构建 LocaleContext,公开请求的语言环境为当前语言环境LocaleContext localeContext = buildLocaleContext(request);// 返回当前绑定到线程的 RequestAttributesRequestAttributes previousAttributes = RequestContextHolder.getRequestAttributes();// 根据请求构建ServletRequestAttributesServletRequestAttributes requestAttributes = buildRequestAttributes(request, response, previousAttributes);// 获取当前请求的 WebAsyncManager,如果没有找到则创建WebAsyncManager asyncManager = WebAsyncUtils.getAsyncManager(request);    asyncManager.registerCallableInterceptor(FrameworkServlet.class.getName(), new RequestBindingInterceptor());// 使 LocaleContext 和 requestAttributes 关联initContextHolders(request, localeContext, requestAttributes);try {//[2] 由 DispatcherServlet 实现doService(request, response);} catch (ServletException ex) {} catch (IOException ex) {} catch (Throwable ex) {} finally {// 重置 LocaleContext 和 requestAttributes,解除关联resetContextHolders(request, previousLocaleContext, previousAttributes);if (requestAttributes != null) {requestAttributes.requestCompleted();}// 发布 ServletRequestHandlerEvent 事件publishRequestHandledEvent(request, startTime, failureCause);}
}
DispatcherServlet 的 doService() 方法主要是设置一些 request 属性,并调用 doDispatch() 方法进行请求分发处理,doDispatch() 方法的主要过程是通过 HandlerMapping 获取 Handler,再找到用于执行它的 HandlerAdapter,执行 Handler 后得到 ModelAndView ,ModelAndView 是连接“业务逻辑层”与“视图展示层”的桥梁,接下来就要通过 ModelAndView 获得 View,再通过它的 Model 对 View 进行渲染。doDispatch() 方法如下
org.springframework.web.servlet.DispatcherServlet#doDispatch
protected void doDispatch(HttpServletRequest request, HttpServletResponse response) throws Exception {HttpServletRequest processedRequest = request;HandlerExecutionChain mappedHandler = null;boolean multipartRequestParsed = false;// 获取当前请求的WebAsyncManager,如果没找到则创建并与请求关联WebAsyncManager asyncManager = WebAsyncUtils.getAsyncManager(request);try {ModelAndView mv = null;Exception dispatchException = null;try {// 检查是否有 Multipart,有则将请求转换为 Multipart 请求processedRequest = checkMultipart(request);multipartRequestParsed = (processedRequest != request);//[1] 遍历所有的 HandlerMapping 找到与请求对应的 Handler,并将其与一堆拦截器封装到 HandlerExecution 对象中。mappedHandler = getHandler(processedRequest);if (mappedHandler == null || mappedHandler.getHandler() == null) {noHandlerFound(processedRequest, response);return;}//[2]  遍历所有的 HandlerAdapter,找到可以处理该 Handler 的 HandlerAdapterHandlerAdapter ha = getHandlerAdapter(mappedHandler.getHandler());// 处理 last-modified 请求头 String method = request.getMethod();boolean isGet = "GET".equals(method);if (isGet || "HEAD".equals(method)) {long lastModified = ha.getLastModified(request, mappedHandler.getHandler());if (new ServletWebRequest(request, response).checkNotModified(lastModified) && isGet) {return;}}// [3] 遍历拦截器,执行它们的 preHandle() 方法if (!mappedHandler.applyPreHandle(processedRequest, response)) {return;}try {//[4]  执行实际的处理程序mv = ha.handle(processedRequest, response, mappedHandler.getHandler());} finally {if (asyncManager.isConcurrentHandlingStarted()) {return;}}applyDefaultViewName(request, mv);// [5] 遍历拦截器,执行它们的 postHandle() 方法mappedHandler.applyPostHandle(processedRequest, response, mv);} catch (Exception ex) {dispatchException = ex;}//[6]  处理执行结果,是一个 ModelAndView 或 Exception,然后进行渲染processDispatchResult(processedRequest, response, mappedHandler, mv, dispatchException);} catch (Exception ex) {} catch (Error err) {} finally {if (asyncManager.isConcurrentHandlingStarted()) {//[7]  遍历拦截器,执行它们的 afterCompletion() 方法  mappedHandler.applyAfterConcurrentHandlingStarted(processedRequest, response);return;}// Clean up any resources used by a multipart request.if (multipartRequestParsed) {cleanupMultipart(processedRequest);}}
}
0x01 Spring web解析过程
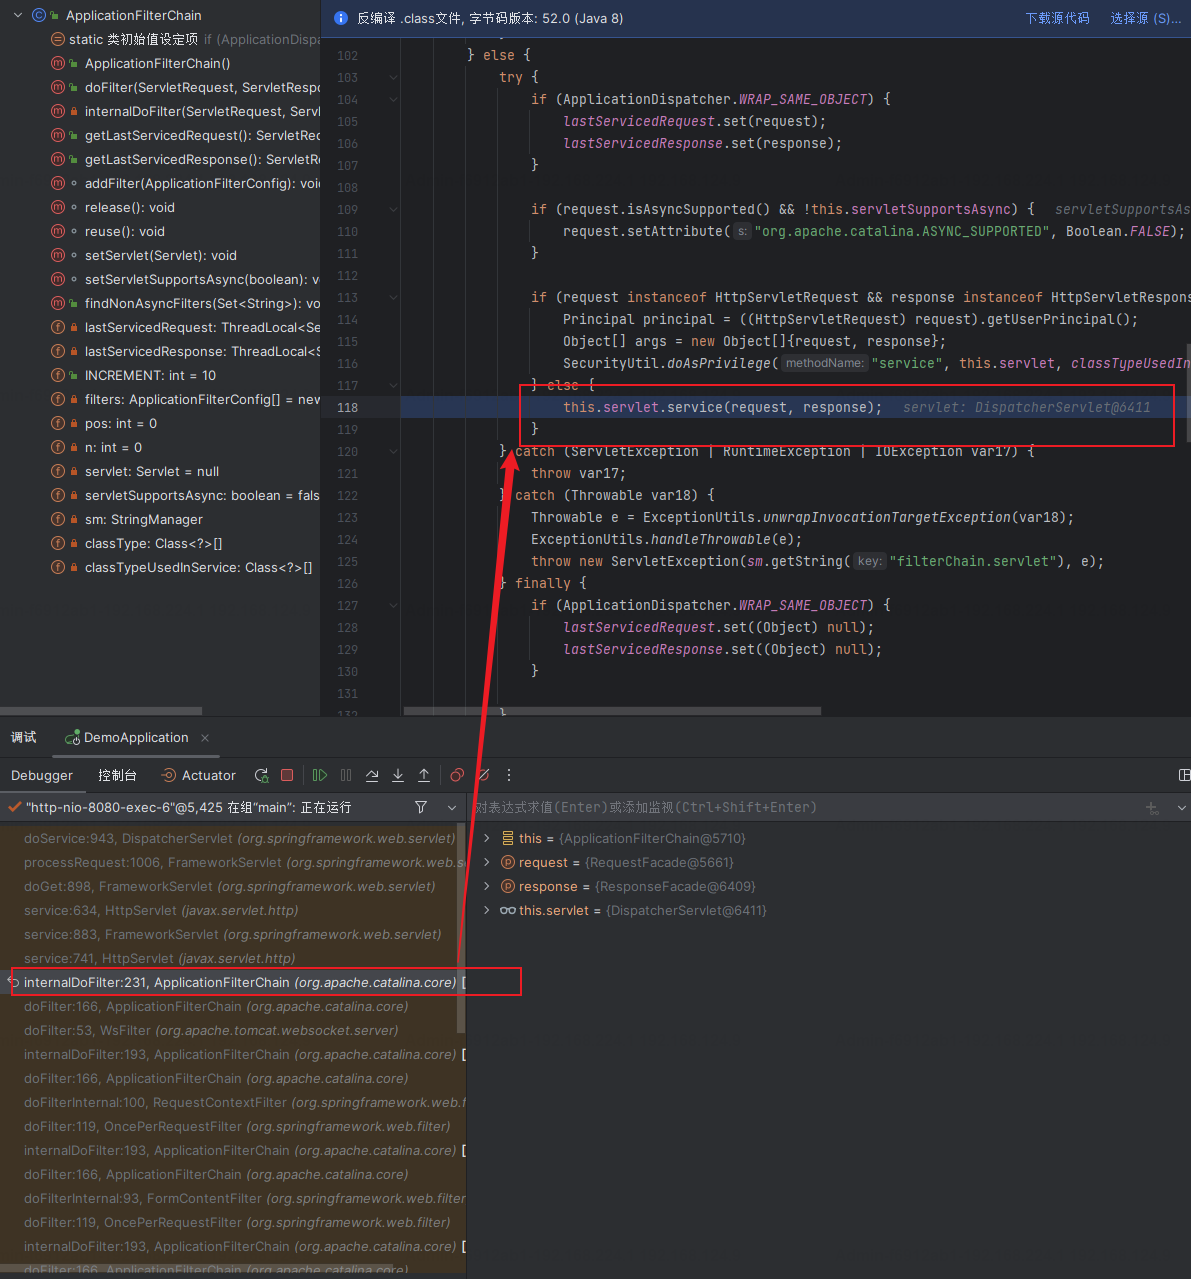
以上只是从DispatcherServlet这里说起的请求解析,但是对于springboot的请求,具体怎么请求到DispatcherServlet,还是要做下debug跟踪;可以在org.springframework.web.servlet.DispatcherServlet#doDispatch处下断点;
在过完Filterchain链上所有的Filter后最后调用了DispatcherServlet的servlet方法。
调用DispatcherServlet的service方法且传入的参数是ServletRequest,ServletResponse类型。但是在DispatcherServlet中并没有service方法,在DispatcherServlet的父类FrameworkServlet中也没有重写接收ServletRequest和ServletResponse的对象service方法,所以调用链到了上一级父类Httpservlet这个抽象类的service方法。Httpservlet中的service方法又调用了接收HttpServletRequest对象的service方法,该方法又被FrameworkServlet重写。故最后调用了FrameworkServlet中的service。完全符合上面的调用链顺序。这里比较绕;
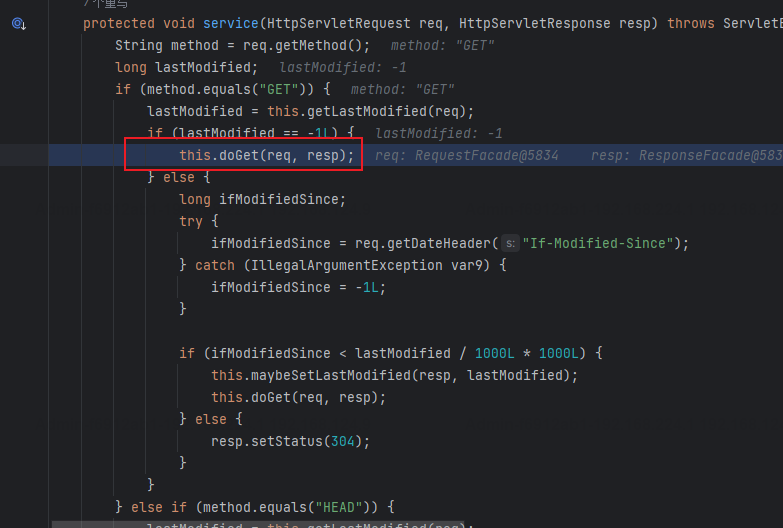
FrameworkServlet的service方法中super调用了Httpservlet的service方法,值得注意的是在该方法中调用的doGet方法并不是Httpservlet的doGet方法,而是FrameworkServlet的doGet方法(抽象类);
javax.servlet.http.HttpServlet#service(javax.servlet.http.HttpServletRequest, javax.servlet.http.HttpServletResponse)
之后则进入之前DispatcherServlet的doDispatch方法;HandlerMapping是一个接口,负责将客户端的HTTP请求映射到对应的Controller。具体来说,它决定哪个Controller应该处理一个给定的请求。其中RequestMappingHandlerMapping用的最多,它支持@RequestMapping注解,并且通常与@Controller注解一起使用。
mappedHandler = getHandler(processedRequest);
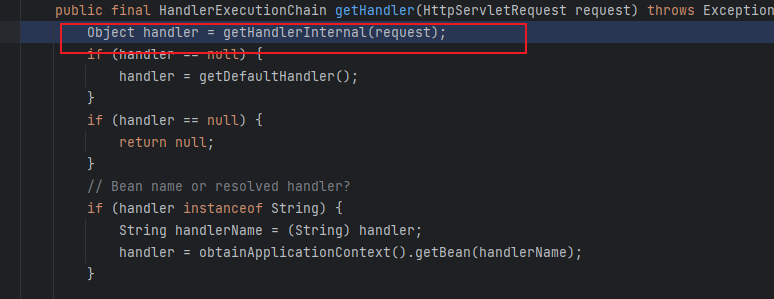
getHandler就是从已注册的handlerMappings中获取一个HandlerExecutionChain对象,这个对象是对请求要执行的处理器以及其所有相关的拦截器的封装。
protected HandlerExecutionChain getHandler(HttpServletRequest request) throws Exception {if (this.handlerMappings != null) {for (HandlerMapping mapping : this.handlerMappings) {HandlerExecutionChain handler = mapping.getHandler(request);if (handler != null) {return handler;}}}return null;}
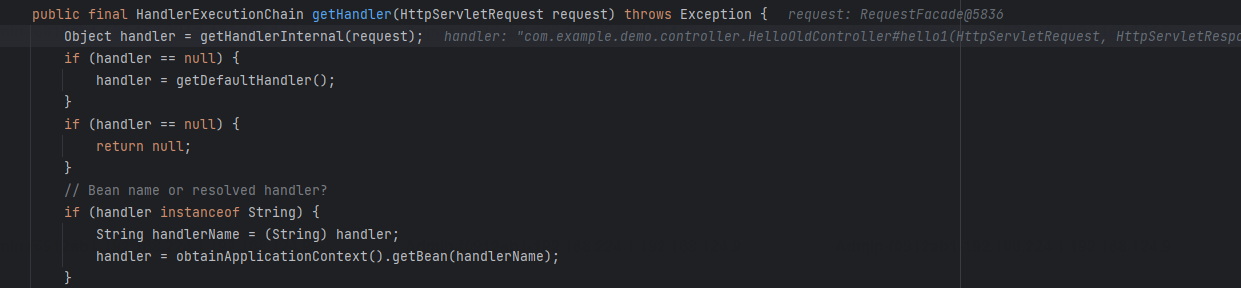
getHandlerInternal方法是将HTTP请求找到处理这个请求的Handler,然后将其包装到HandlerExecutionChain对象中,以便后续的处理流程。
到此基本可以确定springweb对url的匹配是在getHandlerInternal之中;
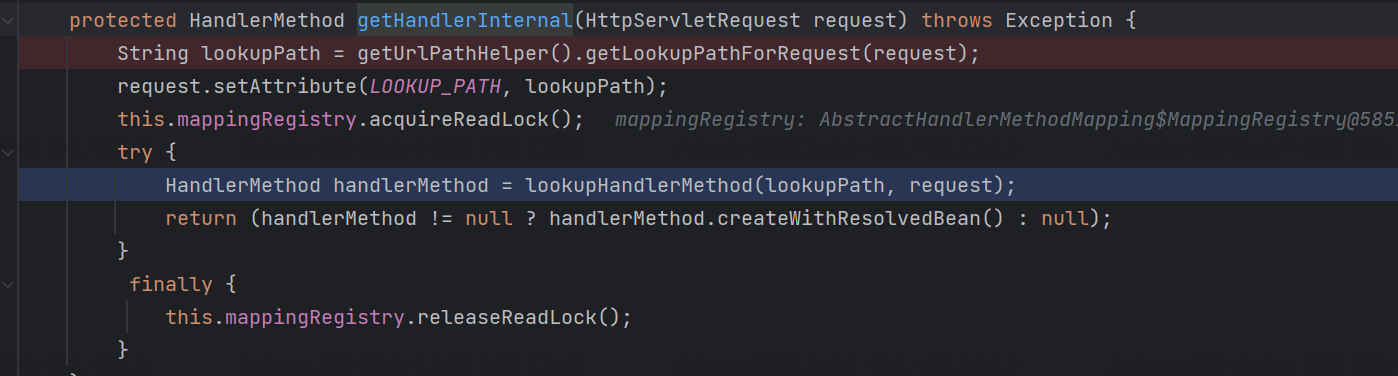
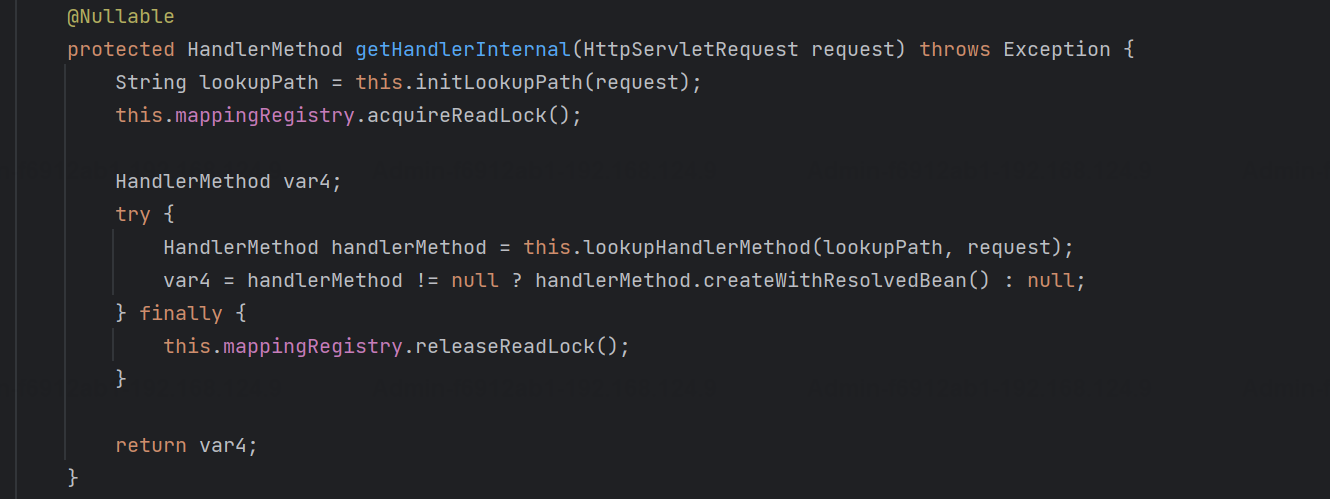
org.springframework.web.servlet.handler.AbstractHandlerMethodMapping#getHandlerInternal
protected HandlerMethod getHandlerInternal(HttpServletRequest request) throws Exception {String lookupPath = getUrlPathHelper().getLookupPathForRequest(request);request.setAttribute(LOOKUP_PATH, lookupPath);this.mappingRegistry.acquireReadLock();try {HandlerMethod handlerMethod = lookupHandlerMethod(lookupPath, request);return (handlerMethod != null ? handlerMethod.createWithResolvedBean() : null);}finally {this.mappingRegistry.releaseReadLock();}
}
到此算是个关键点了,因为涉及安全问题相关的会在其中的两个函数走到后续相应关键函数触发点,不过按照正常的路由解析流程,路径归一化问题先不在此展开,我们先完整将后续流程走完,后续再回来看其中涉及到的问题;
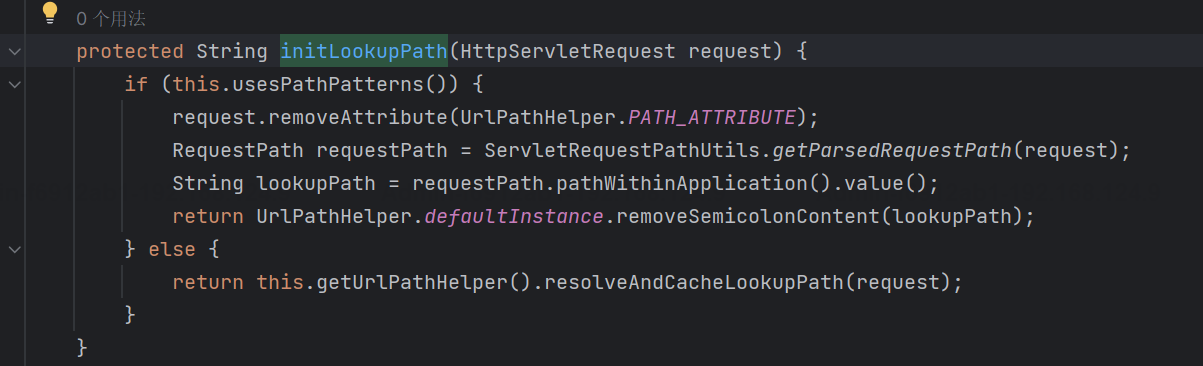
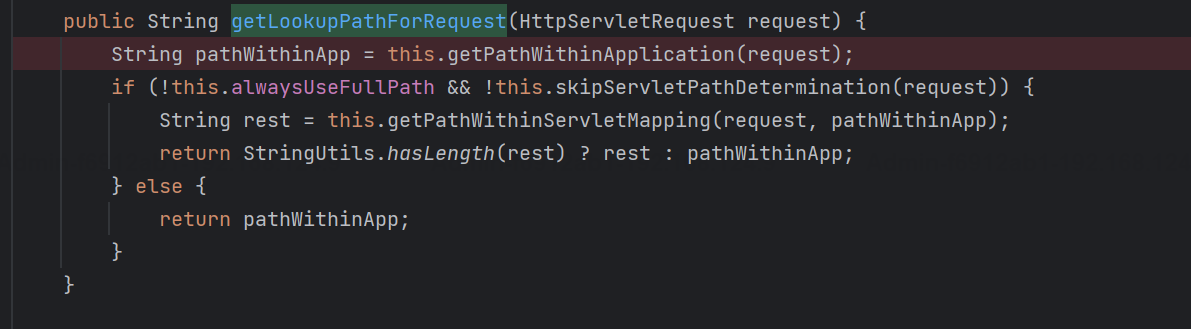
看过路径归一化的师傅们应该到这里就很熟悉了,这个版本的函数叫getLookupPathForRequest,新版本叫initLookupPath。而这行代码也就是为了获得请求路径(通俗说就是我们请求的url)。所以问题关键就是在这里;我们先按照路由解析流程走,之后再来看其涉及到的相关问题;
public String getLookupPathForRequest(HttpServletRequest request) {if (this.alwaysUseFullPath) {return this.getPathWithinApplication(request);} else {String rest = this.getPathWithinServletMapping(request);return !"".equals(rest) ? rest : this.getPathWithinApplication(request);}
}
路由匹配
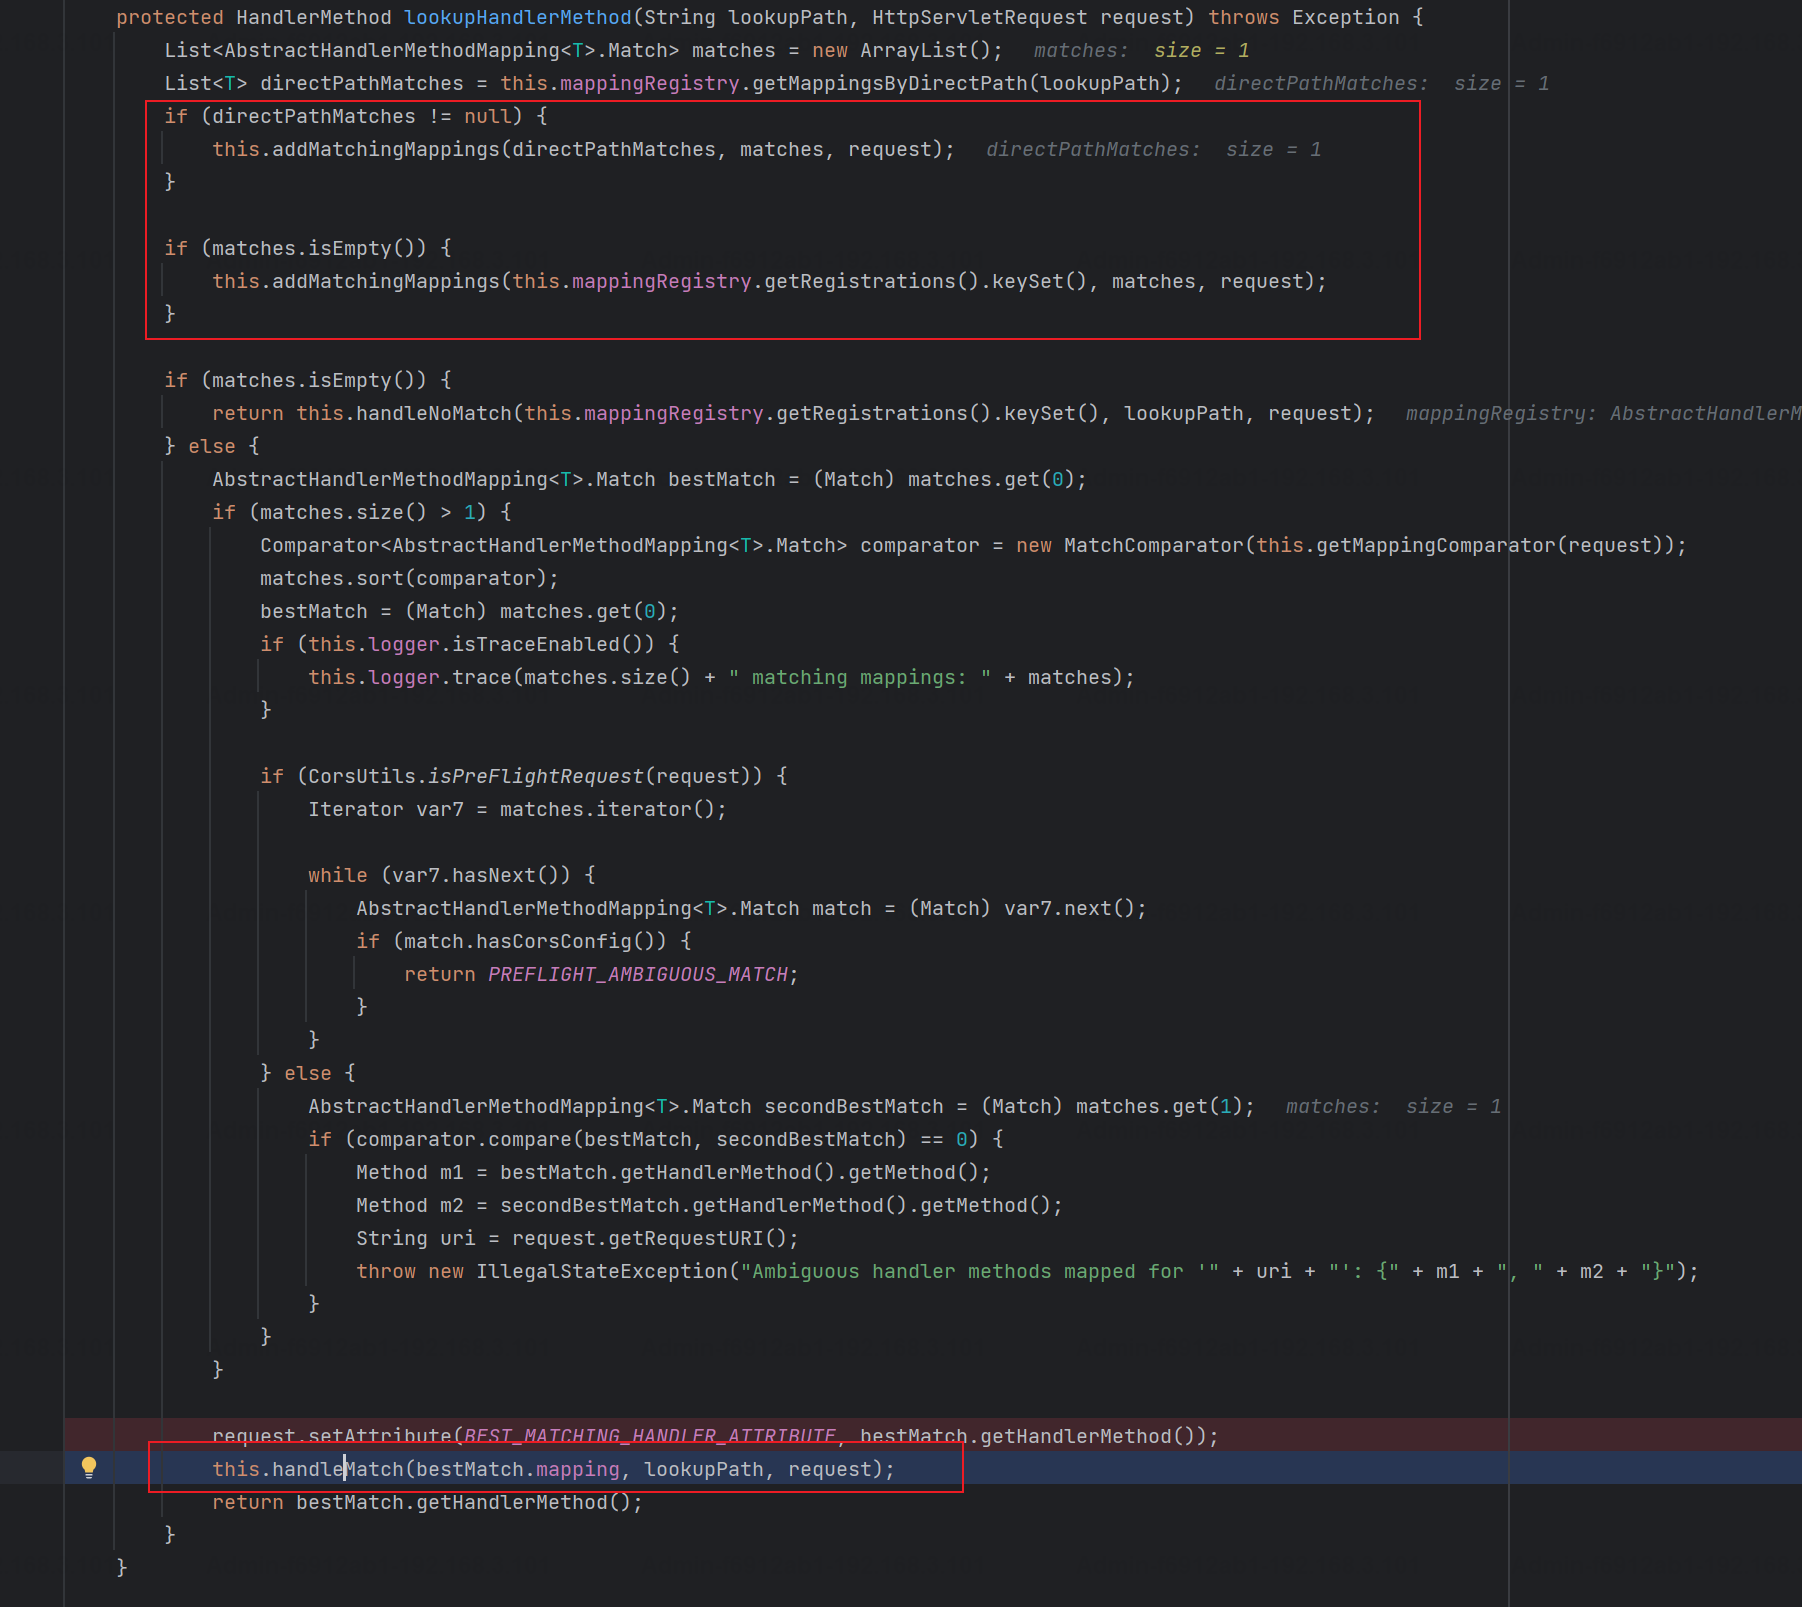
上面的是涉及路径归一化处理,而获取到路径后,调用lookupHandlerMethod方法,首先直接根据路径获取对应的Mapping,获取不到的话调用addMatchingMappings遍历所有的ReuqestMappingInfo对象并进行匹配:
org.springframework.web.servlet.handler.AbstractHandlerMethodMapping#lookupHandlerMethod
protected HandlerMethod lookupHandlerMethod(String lookupPath, HttpServletRequest request) throws Exception {List<Match> matches = new ArrayList<>();List<T> directPathMatches = this.mappingRegistry.getMappingsByUrl(lookupPath);if (directPathMatches != null) {addMatchingMappings(directPathMatches, matches, request);}if (matches.isEmpty()) {// No choice but to go through all mappings...addMatchingMappings(this.mappingRegistry.getMappings().keySet(), matches, request);}...}
核心方法getMatchingMapping实际上调用的是org.springframework.web.servlet.mvc.method.RequestMappingInfoHandlerMapping#getMatchingCondition方法:
getMatchingCondition不同版本的实现也是不一样的,高版本会使用PathPattern来进行URL匹配(不同版本会有差异,在 2.6之前,默认使用的是AntPathMatcher进行的字符串模式匹配)。在getMatchingCondition中会检查各种条件是否匹配,例如请求方法methods、参数params、请求头headers还有出入参类型等等,其中patternsCondition.getMatchingCondition(request)是核心的路径匹配方法:
public RequestMappingInfo getMatchingCondition(HttpServletRequest request) {RequestMethodsRequestCondition methods = this.methodsCondition.getMatchingCondition(request);if (methods == null) {return null;}ParamsRequestCondition params = this.paramsCondition.getMatchingCondition(request);if (params == null) {return null;}HeadersRequestCondition headers = this.headersCondition.getMatchingCondition(request);if (headers == null) {return null;}ConsumesRequestCondition consumes = this.consumesCondition.getMatchingCondition(request);if (consumes == null) {return null;}ProducesRequestCondition produces = this.producesCondition.getMatchingCondition(request);if (produces == null) {return null;}PatternsRequestCondition patterns = this.patternsCondition.getMatchingCondition(request);if (patterns == null) {return null;}RequestConditionHolder custom = this.customConditionHolder.getMatchingCondition(request);if (custom == null) {return null;}return new RequestMappingInfo(this.name, patterns,methods, params, headers, consumes, produces, custom.getCondition());
}
org.springframework.web.servlet.mvc.condition.PatternsRequestCondition#getMatchingCondition
public PatternsRequestCondition getMatchingCondition(HttpServletRequest request) {String lookupPath = this.pathHelper.getLookupPathForRequest(request, HandlerMapping.LOOKUP_PATH);List<String> matches = getMatchingPatterns(lookupPath);return !matches.isEmpty() ? new PatternsRequestCondition(new LinkedHashSet<>(matches), this) : null;}
会调用PatternsRequestCondition#getMatchingPattern方法进行相关的匹配。如果模式与路径相等,直接返回模式,否则进行后缀模式匹配,这里涉及到两个属性SuffixPatternMatch&TrailingSlashMatch,根据这两个属性的boolean值会调用pathMatcher#match方法进行进一步的匹配:
org.springframework.web.servlet.mvc.condition.PatternsRequestCondition#getMatchingPattern
private String getMatchingPattern(String pattern, String lookupPath) {if (pattern.equals(lookupPath)) {return pattern;}if (this.useSuffixPatternMatch) {if (!this.fileExtensions.isEmpty() && lookupPath.indexOf('.') != -1) {for (String extension : this.fileExtensions) {if (this.pathMatcher.match(pattern + extension, lookupPath)) {return pattern + extension;}}}else {boolean hasSuffix = pattern.indexOf('.') != -1;if (!hasSuffix && this.pathMatcher.match(pattern + ".*", lookupPath)) {return pattern + ".*";}}}if (this.pathMatcher.match(pattern, lookupPath)) {return pattern;}if (this.useTrailingSlashMatch) {if (!pattern.endsWith("/") && this.pathMatcher.match(pattern + "/", lookupPath)) {return pattern + "/";}}return null;
}
查后续获取到url 和 Handler 映射关系后,springMVC就可以根据请求的uri来找到对应的Controller和method,处理和响应请求:
路径归一化
紧接着之前getHandlerInternal的处理,低版本是叫做getLookupPathForRequest,新版本叫initLookupPath(spring web >=5.3.x)
因为后续的整个路由解析过程基本都是在org.springframework.web.util.UrlPathHelper这个工具类中进行的,这个也是我们路由归一化问题的关键类,其中涉及到的一些安全关键属性也是这个类;
org.springframework.web.servlet.handler.AbstractHandlerMethodMapping#getHandlerInternal
这里的话我们就会发现特定的参数alwaysUseFullPath,默认为false;因此继续跟进;
org.springframework.web.util.UrlPathHelper#getPathWithinApplication

获取url的是getRequestUri方法;
org.springframework.web.util.UrlPathHelper#getRequestUri
跟进回到decodeAndCleanUriString函数,这个基本就是我们路径归一化问题的关键;
org.springframework.web.util.UrlPathHelper#decodeAndCleanUriString

-
removeSemicolonContentInternal函数作用:
-
移除所有的分号
-
移除分号后面直到下一个斜杠”/”之间的所有字符(若没有“/”则分号后内容全部移除)
-
-
decodeRequestString函数对url进行解码;这个也就是会存在编码绕过的原因(当然nginx也会存在解码处理);
-
getSanitizedPath把双/替换成单/
这里可能就存在/api/xxxxxx;js这种形式的绕过,过滤器中若是存在静态文件不鉴权的逻辑,则可能存在绕过;
回到springweb对请求的处理,有个地方需要注意,在getLookupPathForRequest之中可以看到this.alwayUseFullPath。这个地方也是一个出现漏洞的点,在springboot2.3.0RELEASE之前spring是可以解析/api/a/../xxxx为/api/xxxx的,是因为this.alwayUseFullPath默认为false,而在springboot2.3.0RELEASE之后,this.alwayUseFullPath默认为true。将无法再解析/api/a/../xxxx,会直接认为该url是个路径,去匹配相应的controller。
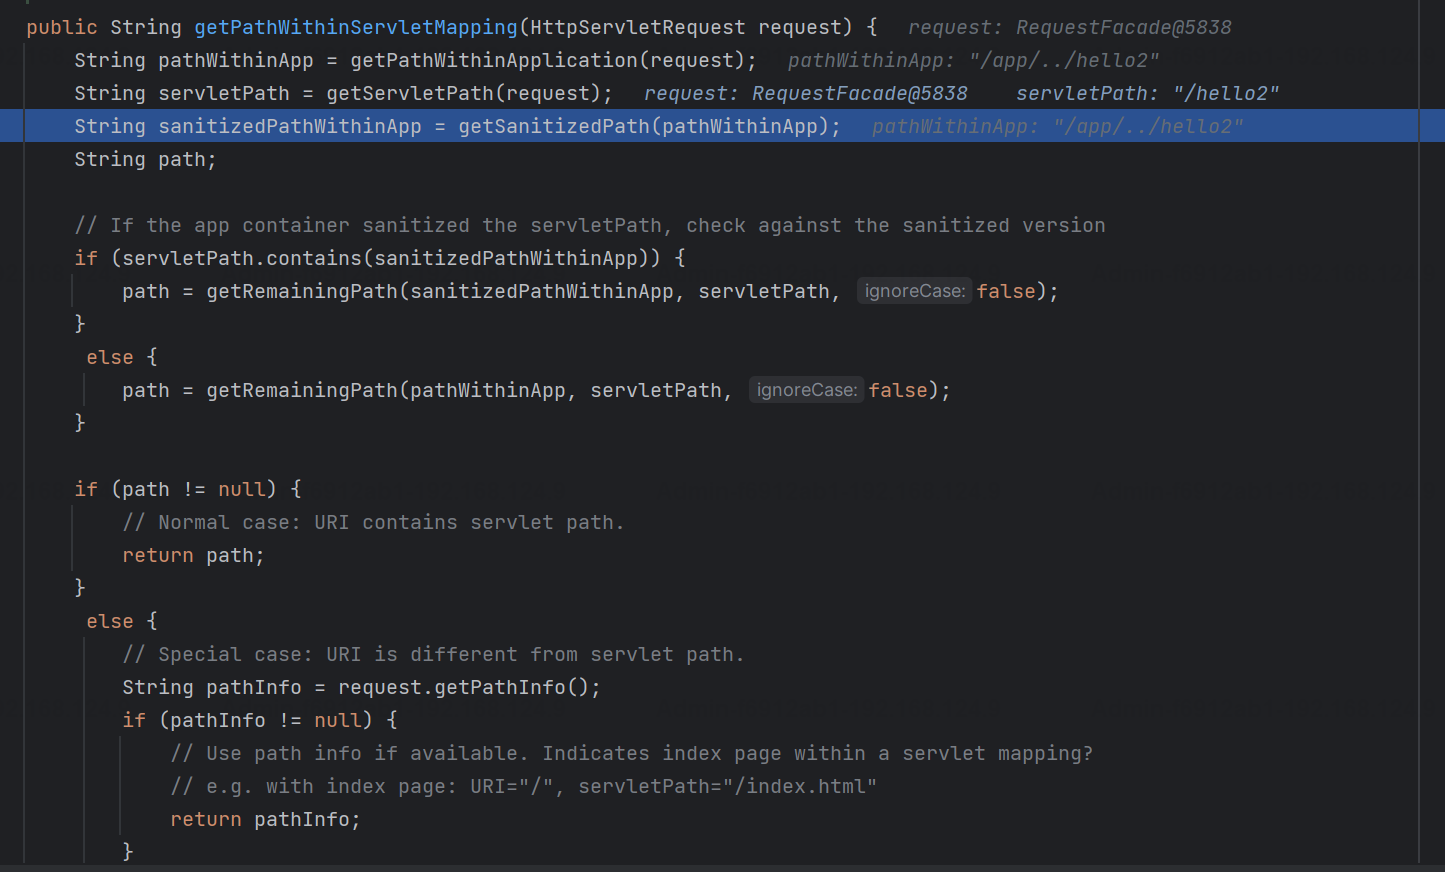
在低版本中,或者说是在alwayUseFullPath为false时,则会执行getPathWithinServletMapping,其中虽然也会存在getPathWithinApplication的调用,但是关键还是getServletPat获取url;因此就像下图一样,spring路由最终会被寻找为对应controller;这个应该是内置的tomca处理;
org.springframework.web.util.UrlPathHelper#getPathWithinServletMapping

0x02 关键属性
SuffixPatternMatch/TrailingSlashMatch(后缀/结尾匹配模式)
SuffixPatternMatch是后缀匹配模式,当启用后缀匹配模式时,例如/hello和/hello.do的匹配结果是一样的;
当TrailingSlashMatch为true时,会应用尾部的/匹配,例如/hello和/hello/的匹配结果是一样的
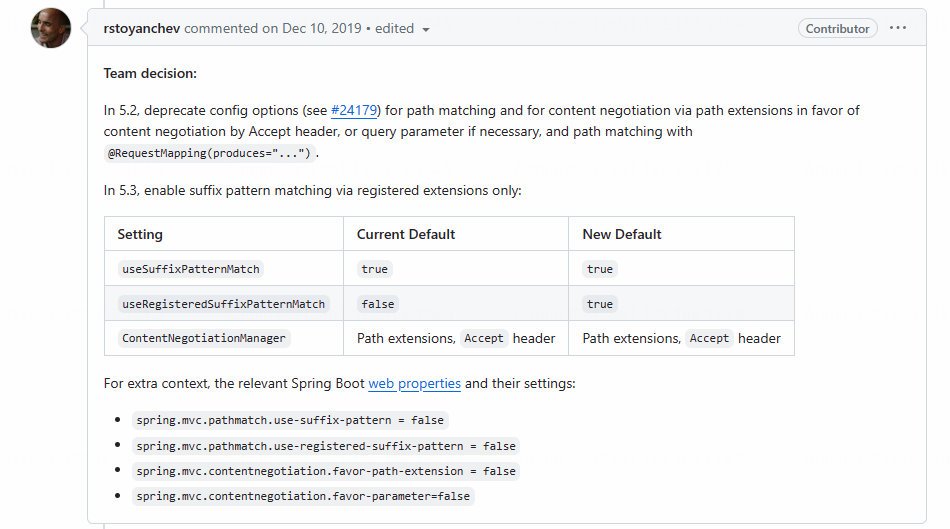
5.3后相关useSuffixPatternMatch的默认值会由true变为false,参考https://github.com/spring-projects/spring-framework/issues/23915
以下版本差异可能不准确(待确认)
| Spring Boot 版本 | suffixPatternMatch 默认值 |
|---|---|
| 2.5.x 及以下 | false |
| 2.6.0 及以上 | true |
| Spring MVC 版本 | suffixPatternMatch 默认值 |
|---|---|
| 5.2.x 及以下 | true |
| 5.3.x 及以上 | false |
alwaysUseFullPath
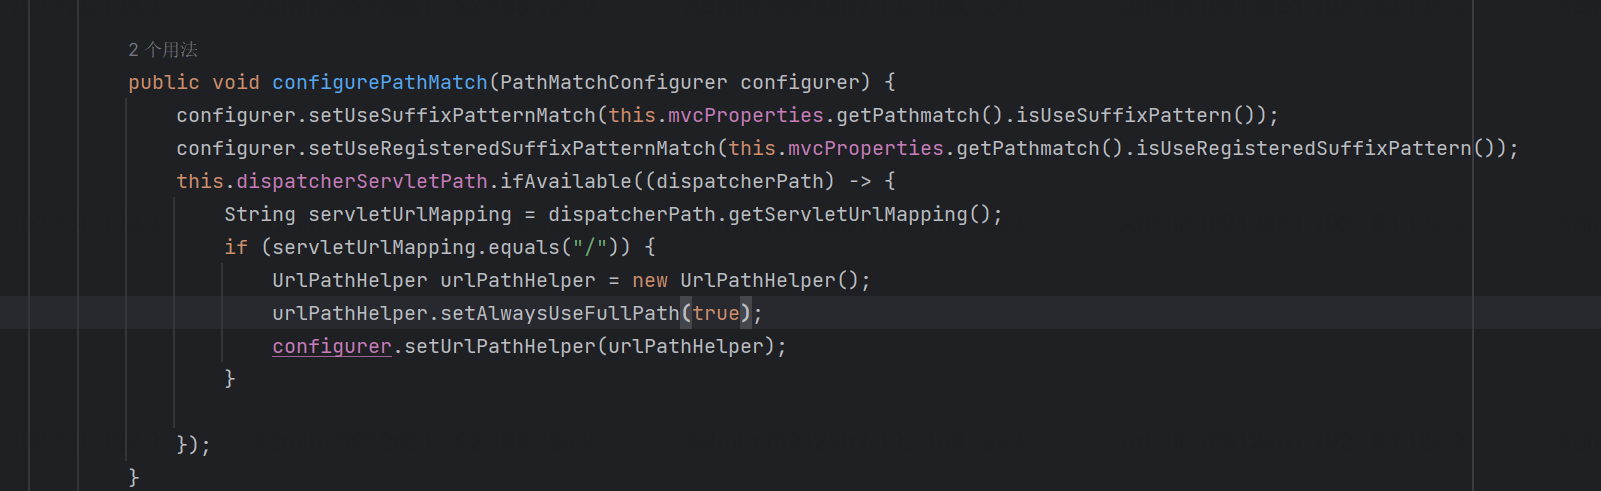
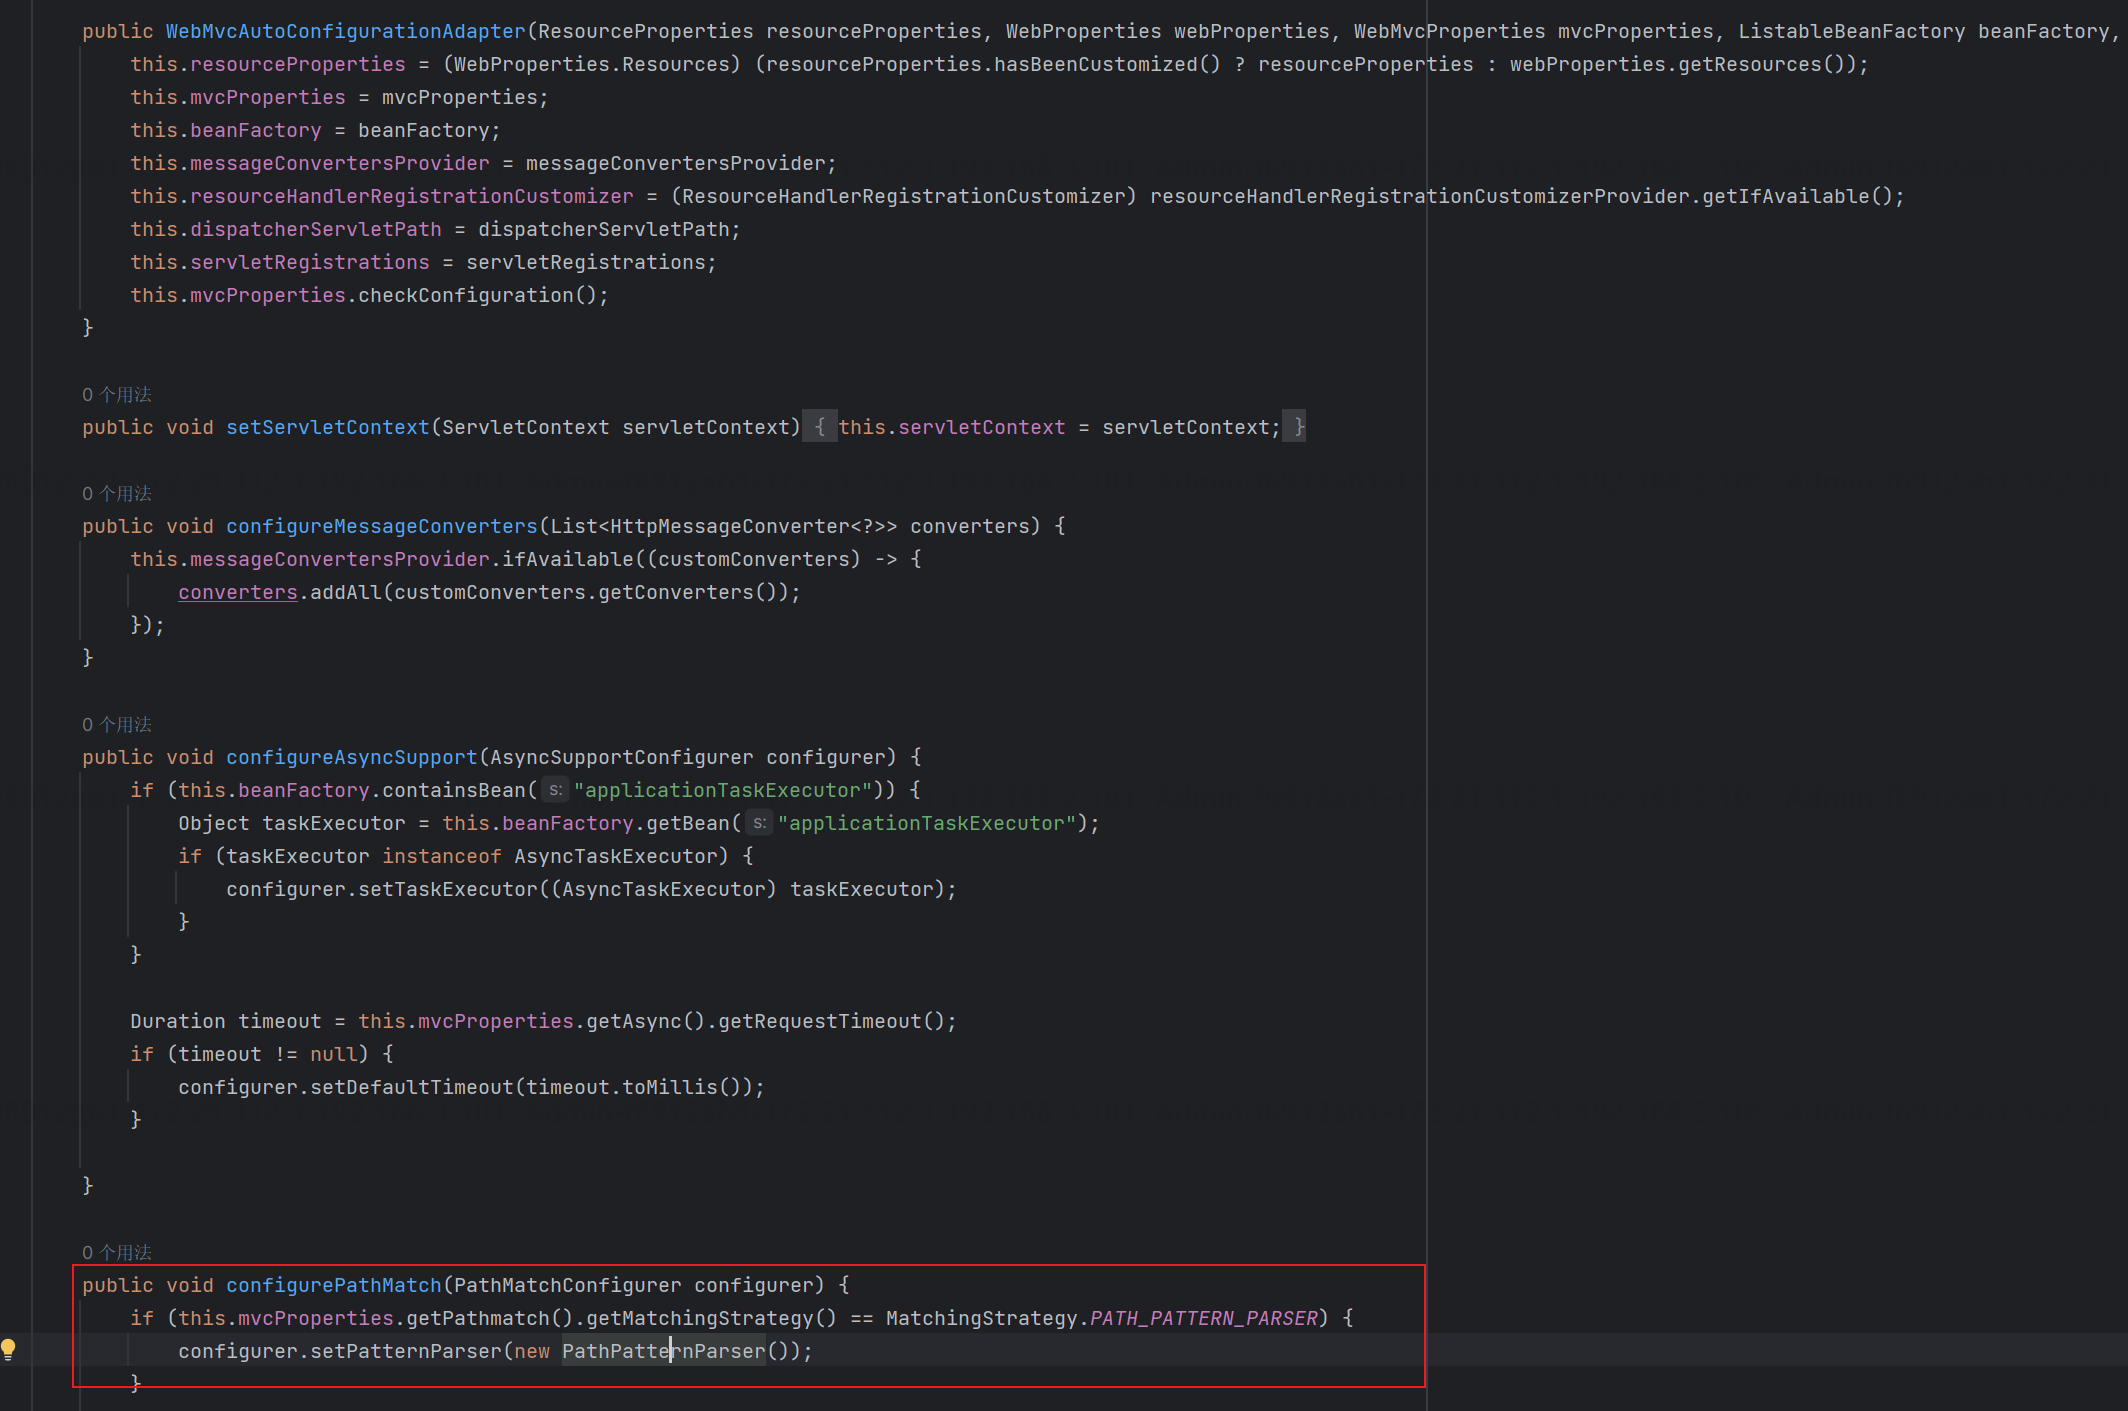
如之前所说,该属性的版本关键点是spring-boot-autoconfigure-2.3.0.RELEASE;在2.3.0以及之前版本,默认为false;在2.3.1以及之后在configurePathMatch中通过实例化UrlPathHelper对象并调用对应的setAlwaysUseFullPath方法将alwaysUseFullPath属性设置为true;
什么地方触发的函数执行?(静态代码?)
org.springframework.boot.autoconfigure.web.servlet.WebMvcAutoConfiguration#configurePathMatch
针对为false存在鉴权绕过的情况,我们需要格外注意;
getPathWithinApplication
- 处理;分隔符
- URL解码
- 归一化多个///
getPathWithinServletMapping
- 处理;分隔符
- URL解码
- 归一化多个///
- 处理目录穿越符
PathPattern
- 处理;分隔符
- URL解码
- 匹配请求路径尾部额外的斜杠
AntPathMatcher
- SuffixPatternMatch后缀匹配模式
- TrailingSlashMatch尾部/匹配
- trimTokens属性消除path空格
解析器
以上只是分析了spring boot2.3.1中版本的问题,但是在UrlPathHelper不同版本也是有所区别,我们使用的函数叫getLookupPathForRequest,新版本叫initLookupPath(看介绍都说是spring5.3开始的)在新版本中其处理逻辑多了一些操作;
如在springboot2.4.12(spring-web5.3.12)中,
org.springframework.web.servlet.handler.AbstractHandlerMethodMapping#getHandlerInternal
org.springframework.web.servlet.handler.AbstractHandlerMapping#initLookupPath
从这里可以看到有个usesPathPatterns();在springboot2.6以上版本会使用解析器PathPattern,则会走这个路径;
org.springframework.web.util.UrlPathHelper#resolveAndCacheLookupPath

org.springframework.web.util.UrlPathHelper#getLookupPathForRequest(javax.servlet.http.HttpServletRequest)
多了usesPathPatterns参数;若是该参数设置为true,会走进removeSemicolonContent函数,处理分号“;”相关的逻辑,对比原先少了两步处理;
java - Spring5 里边的新玩法!这种 URL 请求让我涨见识了! - 个人文章 - SegmentFault 思否
AntPathMatcher&PathPattern功能解释
具体功能:
@GetMapping("/hello/**/hello")
public String hello() {return "/hello/**/hello";
}
@GetMapping("/h?llo")
public String hello2() {return "/h?llo";
}
@GetMapping("/**/*.html")
public String hello3() {return "/**/*.html";
}
@GetMapping("/hello/{p1}/{p2}")
public String hello4(@PathVariable String p1, @PathVariable String p2) {System.out.println("p1 = " + p1);System.out.println("p2 = " + p2);return "/hello/{p1}/{p2}";
}
@GetMapping("/{name:[a-z-]+}-{version:\\d\\.\\d\\.\\d}{ext:\\.[a-z]+}")
public void handle(@PathVariable String name, @PathVariable String version, @PathVariable String ext) {System.out.println("name = " + name);System.out.println("version = " + version);System.out.println("ext = " + ext);
}
AntPathMatcher就是按照以下的路径匹配器执行匹配逻辑;
| 规则 | 作用 |
|---|---|
| ? | 匹配任意单字符 |
| * | 匹配0或者任意数量的字符 |
| ** | 匹配0或者任意层级的目录 |
| 匹配到的path内容赋值给spring变量 |
-
第一个接口,可以接收诸如
/hello/123/123/hello、/hello/a/hello以及/hello/hello这样的请求,因为中间的**代表 0 个或者多个目录。 -
第二个接口,可以接收诸如
/hallo、/hello、/hMllo之类的请求,注意它不能接收/haallo或者/hllo,因为?表示一个字符。 -
第三个接口可以接收任意以
.html为后缀的请求,例如/aaa/bb/cc.html、/aa.html或者/aa/aa.html。 -
第四个接口估计大家都比较熟悉,在 RESTful 风格的接口设计中估计大家都用过,它接收的请求格式类似于
/hello/aa/bb,其中参数 p1 就对应 aa,参数 p2 对应 bb。 -
第五个接口则用到了正则,name、version 以及 ext 三个参数格式用正则表达出来,它可以接收诸如
/spring-web-3.0.5.jar格式的请求,最终的参数 name 就是spring-web,version 就是3.0.5,ext 则是.jar。
Spring5.3之后的按照官方推荐的是PathPattern。多了以下匹配项
{*spring}matches zero or more path segments until the end of the path and captures it as a variable named "spring"
PathPattern 与 AntPathMatcher 的差异主要体现在两个方面:
-
PathPattern 只支持结尾部分使用
**,如果在路径的中间使用**就会报错,上文中第一个和第三个接口,在 PathPattern 模式下会报错。 -
PathPattern 支持使用诸如
{*path}的方式进行路径匹配,这种写法也可以匹配到多层路径,并且将匹配到的值赋值给 path 变量,例如如下一个接口:
@GetMapping("/javaboy/{*path}")
public void hello6(@PathVariable String path) {System.out.println("path = " + path);
}
{*path}表示匹配余下的path路径部分并将其赋值给名为spring的变量(变量名可以根据实际情况随意命名,与@PathVariable名称对应即可)。同时,**{*path}是可以匹配剩余所有path的,类似/**,只是功能更强,可以获取到这部分动态匹配到的内容;
版本区别
对于解析器AntPathMatcher&PathPattern主要是这两个设置,而解析器的选择在spring boot中org.springframework.boot.autoconfigure.web.servlet.WebMvcAutoConfiguration是关于Spring MVC自动配置类,WebMvcAutoConfiguration自动配置类中包含了一个静态类WebMvcAutoConfigurationAdapter,通过这里加载的WebMvcProperties内容也可以看出来具体的差异:
AntPathMatcher
AntPathMatcher所属模块为spring-core,对应classorg.springframework.util.AntPathMatcher。
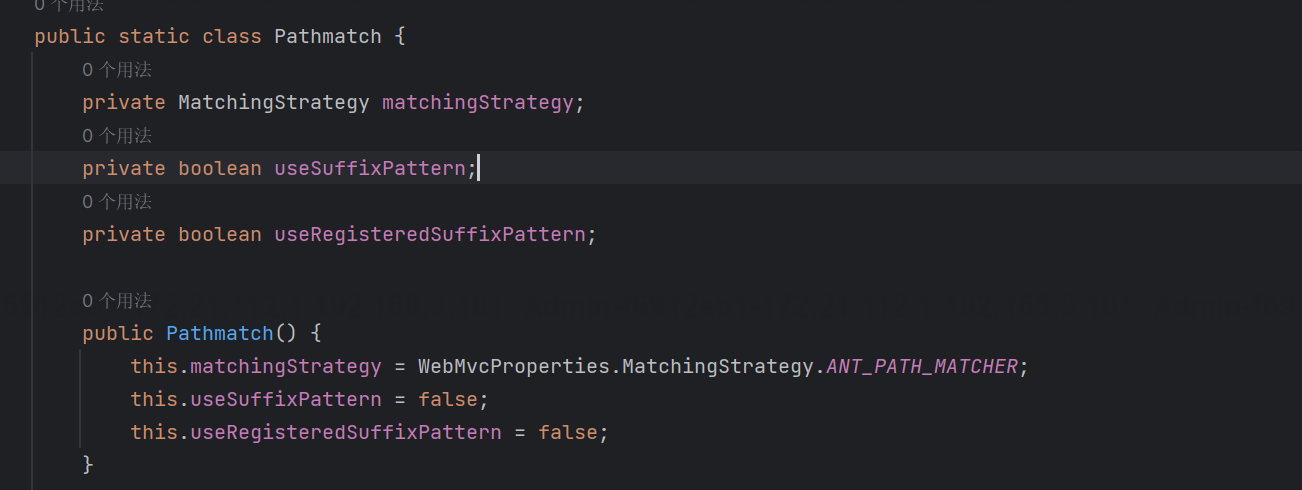
在 2.6之前,默认使用的是AntPathMatcher(具体配置在org.springframework.boot.autoconfigure.web.servlet.WebMvcProperties.Pathmatch),查看具体的代码:
具体入口跟踪是在这里
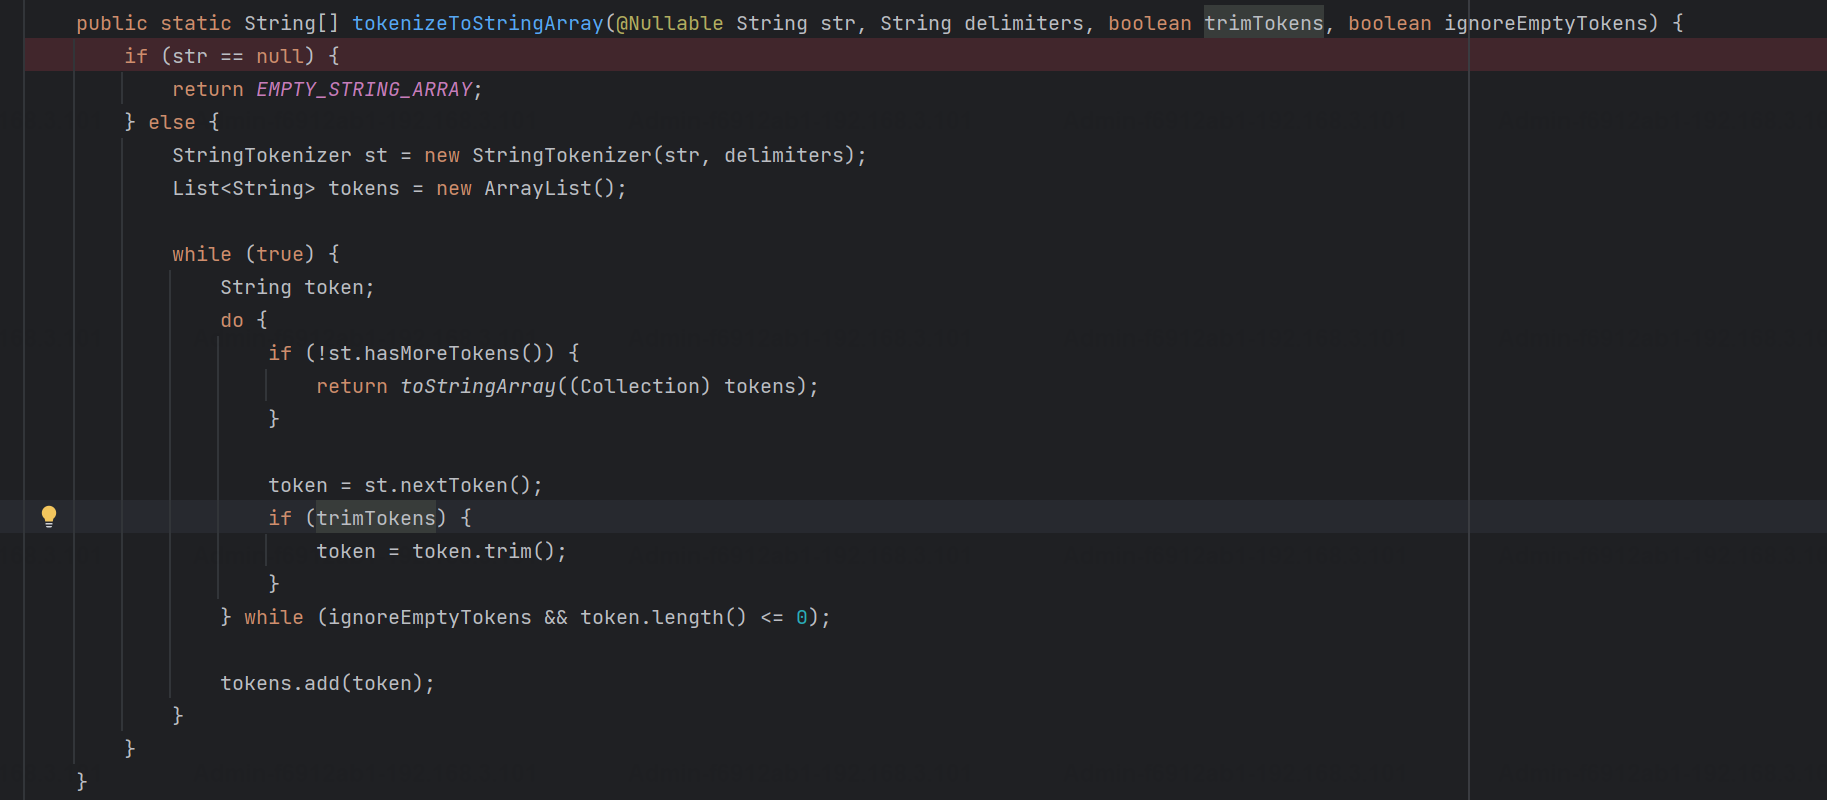
具体的匹配在org.springframework.util.AntPathMatcher#doMatch方法,首先调用tokenizePattern()方法将pattern分割成了String数组,如果是全路径并且区分大小写,那么就通过简单的字符串检查,看看path是否有潜在匹配的可能,没有的话返回false:

然后调用tokenizePath()方法将需要匹配的path分割成string数组,主要是通过java.util 里面的StringTokenizer来处理字符串;属性trimTokens(从Spring Framework 4.3.0+开始, AntPathMatcher将 trimTokens 设置为false),这个属性主要是用于消除path中的空格(之前由于与SpringSecurity的解析差异导致了CVE-2016-5007、CVE-2020-17523)::
spring security CVE-2016-5007:/admin%20
shiro CVE-2020-17523:/admin/%20或 /admin/%20/

后面就是pathDirs和pattDirs两个数组的处理逻辑(包含相关正则的匹配,java.util.regex.compile#matcher);
PathPattern
PathPattern是Spring5新增的API,所属模块为spring-web,对应class org.springframework.web.util.pattern.PathPattern。
2.6.0及之后WebMvcProperties的配置就变成了PathPattern了;
如上文中所说在org.springframework.web.servlet.handler.AbstractHandlerMapping#initLookupPath这里会走usesPathPatterns();触发相关的逻辑;
以及Spring会使用PathPatternsRequestCondition这里进行匹配;之前版本使用的PatternsRequestCondition不同的是,此时的路径解析已经不受到类似SuffixPatternMatch属性的影响了
具体匹配处理:org.springframework.web.util.pattern.PathPattern#matches

0x03 漏洞点
SuffixPatternMatch+auth codefilter/interceptor
1、特定版本SuffixPatternMatch = True
2、security configure配置
/users=/users.*/**/**.*->/**/**.html or /**/**.js
蓝凌OA treexml.tmpl命令执行
POST /data/sys-common/treexml.tmpl HTTP/1.1
Host: {{Hostname}}
User-Agent: Apache-HttpClient/4.5.2 (Java/1.8.0_291)
Content-Length: 17389
Connection: close
RunGo: dir
content-type: application/x-www-form-urlencoded
Accept-Encoding: gzip, deflates_bean=ruleFormulaValidate&script=\u0062\u00
TrailingSlashMatch+auth code
1、特定版本setUsrTrailingSlashMatch = true
2、getRequestURI().equals("/admin/info")
alwaysUserFullPath+filter/interceptor
1、spring boot<2.3.1
2、alwaysUserFullPath=true
/api/noauth/../../inner_api
PathPattern+filter/interceptor
sping boot>2.6.0
存在/admin/**的controller
利用:/admin/..
CVE-2023-22602
shiro+spring security相关漏洞
shiro:CVE-2023-22602、CVE-2023-34478
spring security:CVE-2023-20860
url测试
@RequestMapping("test3/**")
测试请求:
GET /test3/api123 HTTP/1.1 -解析
GET /imag/imag/imag/imag/imag/imag/test3..;/test3..;/api123 HTTP/1.1 -不解析
GET /test3/test3/test3/test3/test3/test3..;/test3..;/api123 HTTP/1.1 -解析
GET /test3/test3..;/test3..;/api123 HTTP/1.1 -解析
GET /test3/..;/test3..;/api123 HTTP/1.1 -不解析
apache的servlet构建url规范标准化检查器;会对/../进行标准化处理
org.apache.catalina.connector.CoyoteAdapter#postParseRequest
org.apache.catalina.connector.CoyoteAdapter#normalize