很早之前就看HDRP里面的Color ColorPyramid的生成不爽了,都不知道为什么明明有现成的ColorPyramid.compute放着不用,还是用的是PixelShader生成。DrawCall数量多,效率也不够Compute的方式快。
这篇文章主要解析ColorPyramid.compute怎么用LDS优化GuassianBlur以及不同方式Copy mip 0的性能对比。
很早之前就看HDRP里面的Color ColorPyramid的生成不爽了,都不知道为什么明明有现成的ColorPyramid.compute放着不用,还是用的是PixelShader生成。DrawCall数量多,效率也不够Compute的方式快。
这篇文章主要解析ColorPyramid.compute怎么用LDS优化GuassianBlur以及不同方式Copy mip 0的性能对比。序言
很早之前就看HDRP里面的Color ColorPyramid的生成不爽了,都不知道为什么明明有现成的ColorPyramid.compute放着不用,还是用的是PixelShader生成。DrawCall数量多,效率也不够Compute的方式快。
这篇文章主要解析ColorPyramid.compute怎么用LDS优化GuassianBlur以及不同方式Copy mip 0的性能对比。
Color Pyramid
ColorPyramid主要用来模拟毛玻璃折射(Refraction)效果,物体表面越粗糙,折射越模糊。(并不物理正确)
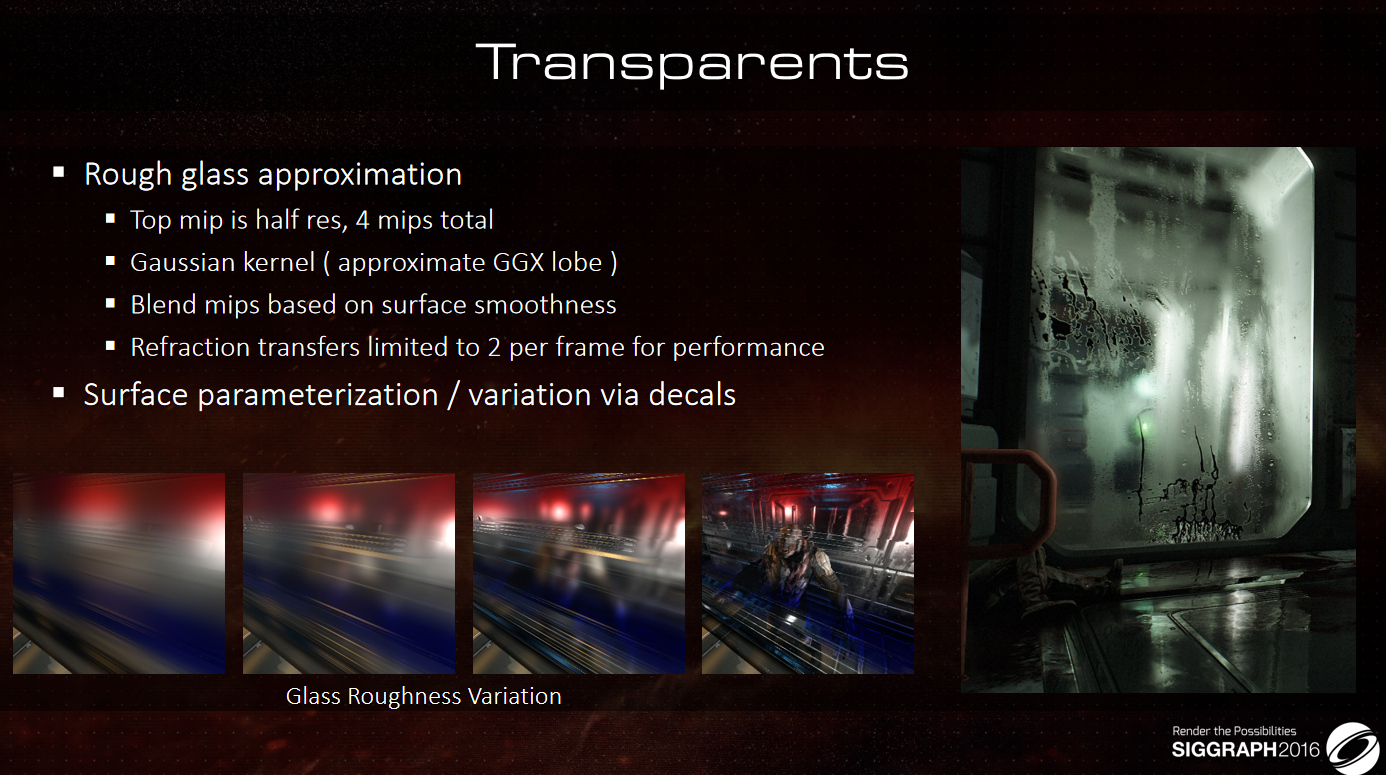
HDRP中通过物体表面的PerceptualRoughness通过一个经验公式映射出一个计算透射时采样ColorPyramid的Mip Level。
PreLightData GetPreLightData(float3 V, PositionInputs posInput, inout BSDFData bsdfData)
{
...
// refraction (forward only)
#if HAS_REFRACTION
RefractionModelResult refraction = REFRACTION_MODEL(V, posInput, bsdfData);
preLightData.transparentRefractV = refraction.rayWS;
preLightData.transparentPositionWS = refraction.positionWS;
preLightData.transparentTransmittance = exp(-bsdfData.absorptionCoefficient * refraction.dist);// Empirical remap to try to match a bit the refraction probe blurring for the fallback
// Use IblPerceptualRoughness so we can handle approx of clear coat.
preLightData.transparentSSMipLevel = PositivePow(preLightData.iblPerceptualRoughness, 1.3) * uint(max(_ColorPyramidLodCount - 1, 0));
#endif
}通过trilinear三线性过滤,就能够在不同Mip之间做插值。
IndirectLighting EvaluateBSDF_ScreenspaceRefraction(LightLoopContext lightLoopContext,float3 V, PositionInputs posInput,PreLightData preLightData, BSDFData bsdfData,EnvLightData envLightData,inout float hierarchyWeight)
{
...
float2 samplingPositionNDC = lerp(posInput.positionNDC, hit.positionNDC, refractionOffsetMultiplier);
//三线性过滤
float3 preLD = SAMPLE_TEXTURE2D_X_LOD(_ColorPyramidTexture, s_trilinear_clamp_sampler, samplingPositionNDC * _RTHandleScaleHistory.xy, preLightData.transparentSSMipLevel).rgb;// Offset by half a texel to properly interpolate between this pixel and its mips// Inverse pre-exposure
preLD *= GetInverseCurrentExposureMultiplier();// We use specularFGD as an approximation of the fresnel effect (that also handle smoothness)
float3 F = preLightData.specularFGD;
//(1-F模拟菲尼尔效果)
lighting.specularTransmitted = (1.0 - F) * preLD.rgb * preLightData.transparentTransmittance * weight;UpdateLightingHierarchyWeights(hierarchyWeight, weight); // Shouldn't be needed, but safer in case we decide to change hierarchy priority#else // HAS_REFRACTION
// No refraction, no need to go further
hierarchyWeight = 1.0;
#endifreturn lighting;
}
一般在透明队列渲染之前就需要生成mip level越高越模糊的Color Pyramid留着后续透明队列模拟折射时采样。
如果还有Distortion Pass的话,后处理之后还要生成Color Pyramid多一次。
HDRP生成Color Pyramid流程比较简单,
首先申请一张临时的RT用于DownSample(),以及Horizontal Blur输出的临时RT,
读取DownSample的RT Horizontal Blur+vertical Blur输出到ColorPyramid上面,
(Vertical Blur直接输出到ColorPyramid当前Downsample Size所对应的mip中)
mip0不需要模糊直接拷贝即可。
//MipGenerator.cspublic int RenderColorGaussianPyramid(CommandBuffer cmd, Vector2Int size, Texture source, RenderTexture destination)
{...// Mip0直接拷贝m_PropertyBlock.SetTexture(Blitter.BlitShaderIDs._BlitTexture, source);m_PropertyBlock.SetVector(Blitter.BlitShaderIDs._BlitScaleBias, new Vector4(sourceScaleX, sourceScaleY, 0f, 0f));m_PropertyBlock.SetFloat(Blitter.BlitShaderIDs._BlitMipLevel, 0f);cmd.SetRenderTarget(destination, 0, CubemapFace.Unknown, -1);cmd.SetViewport(new Rect(0, 0, srcMipWidth, srcMipHeight));cmd.DrawProcedural(Matrix4x4.identity, Blitter.GetBlitMaterial(source.dimension), 0, MeshTopology.Triangles, 3, 1, m_PropertyBlock);int finalTargetMipWidth = destination.width;int finalTargetMipHeight = destination.height;// Note: smaller mips are excluded as we don't need them and the gaussian compute works// on 8x8 blockswhile (srcMipWidth >= 8 || srcMipHeight >= 8){int dstMipWidth = Mathf.Max(1, srcMipWidth >> 1);int dstMipHeight = Mathf.Max(1, srcMipHeight >> 1);// Scale for downsamplefloat scaleX = ((float) srcMipWidth / finalTargetMipWidth);float scaleY = ((float) srcMipHeight / finalTargetMipHeight);// Downsample输出到临时的RT中m_PropertyBlock.SetTexture(Blitter.BlitShaderIDs._BlitTexture, destination);m_PropertyBlock.SetVector(Blitter.BlitShaderIDs._BlitScaleBias, new Vector4(scaleX, scaleY, 0f, 0f));m_PropertyBlock.SetFloat(Blitter.BlitShaderIDs._BlitMipLevel, srcMipLevel);cmd.SetRenderTarget(m_TempDownsamplePyramid0[rtIndex], 0, CubemapFace.Unknown, -1);cmd.SetViewport(new Rect(0, 0, dstMipWidth, dstMipHeight));cmd.DrawProcedural(Matrix4x4.identity, Blitter.GetBlitMaterial(source.dimension), 1, MeshTopology.Triangles, 3, 1, m_PropertyBlock);...// Blur horizontalm_PropertyBlock.SetTexture(ShaderIDs._Source, m_TempDownsamplePyramid0[rtIndex]);m_PropertyBlock.SetVector(ShaderIDs._SrcScaleBias, new Vector4(scaleX, scaleY, 0f, 0f));m_PropertyBlock.SetVector(ShaderIDs._SrcUvLimits,new Vector4((dstMipWidth - 0.5f) / blurSourceTextureWidth, (dstMipHeight - 0.5f) / blurSourceTextureHeight, 1.0f / blurSourceTextureWidth, 0f));m_PropertyBlock.SetFloat(ShaderIDs._SourceMip, 0);//输出到临时RT上cmd.SetRenderTarget(m_TempColorTargets[rtIndex], 0, CubemapFace.Unknown, -1);cmd.SetViewport(new Rect(0, 0, dstMipWidth, dstMipHeight));cmd.DrawProcedural(Matrix4x4.identity, m_ColorPyramidPSMat, rtIndex, MeshTopology.Triangles, 3, 1, m_PropertyBlock);// Blur verticalm_PropertyBlock.SetTexture(ShaderIDs._Source, m_TempColorTargets[rtIndex]);m_PropertyBlock.SetVector(ShaderIDs._SrcScaleBias, new Vector4(scaleX, scaleY, 0f, 0f));m_PropertyBlock.SetVector(ShaderIDs._SrcUvLimits,new Vector4((dstMipWidth - 0.5f) / blurSourceTextureWidth, (dstMipHeight - 0.5f) / blurSourceTextureHeight, 0f, 1.0f / blurSourceTextureHeight));m_PropertyBlock.SetFloat(ShaderIDs._SourceMip, 0);//输出到Color Pyramid RT的当前Downsample Size对应mip上cmd.SetRenderTarget(destination, srcMipLevel + 1, CubemapFace.Unknown, -1);cmd.SetViewport(new Rect(0, 0, dstMipWidth, dstMipHeight));cmd.DrawProcedural(Matrix4x4.identity, m_ColorPyramidPSMat, rtIndex, MeshTopology.Triangles, 3, 1, m_PropertyBlock);srcMipLevel++;srcMipWidth = srcMipWidth >> 1;srcMipHeight = srcMipHeight >> 1;finalTargetMipWidth = finalTargetMipWidth >> 1;finalTargetMipHeight = finalTargetMipHeight >> 1;}return srcMipLevel + 1;
}
Blur时通过_SrcUvLimits.zw控制采样Offset的方向(Horizontal/Vertical)。
half4 Frag(Varyings input) : SV_Target
{// Gaussian weights for 9 texel kernel from center textel to furthest texel. Keep in sync with ColorPyramid.computeconst half gaussWeights[] = {0.27343750, 0.21875000, 0.10937500, 0.03125000, 0.00390625};//Blur horizontal.  1.0f / blurSourceTextureWidth, 0f//Blur vertical.    0f, 1.0f / blurSourceTextureHeightconst half2 offset = _SrcUvLimits.zw;const half2 offset1 = offset * (1.0 + (gaussWeights[2] / (gaussWeights[1] + gaussWeights[2])));const half2 offset2 = offset * (3.0 + (gaussWeights[4] / (gaussWeights[3] + gaussWeights[4])));half2 uv_m2 = input.texcoord.xy - offset2;half2 uv_m1 = input.texcoord.xy - offset1;half2 uv_p0 = input.texcoord.xy;half2 uv_p1 = min(_SrcUvLimits.xy, input.texcoord.xy + offset1);half2 uv_p2 = min(_SrcUvLimits.xy, input.texcoord.xy + offset2);return+ SAMPLE_TEXTURE2D_LOD(_Source, sampler_LinearClamp, uv_m2, _SourceMip) * (gaussWeights[3] + gaussWeights[4])+ SAMPLE_TEXTURE2D_LOD(_Source, sampler_LinearClamp, uv_m1, _SourceMip) * (gaussWeights[1] + gaussWeights[2])+ SAMPLE_TEXTURE2D_LOD(_Source, sampler_LinearClamp, uv_p0, _SourceMip) * gaussWeights[0]+ SAMPLE_TEXTURE2D_LOD(_Source, sampler_LinearClamp, uv_p1, _SourceMip) * (gaussWeights[1] + gaussWeights[2])+ SAMPLE_TEXTURE2D_LOD(_Source, sampler_LinearClamp, uv_p2, _SourceMip) * (gaussWeights[3] + gaussWeights[4]);
}
Downsample
显然上面除了Mip0之外一个Mip就要调用三次DrawProcedural(Downsample+Horizontal Blur+Vertical Blur)
其中的Horizontal Blur以及Vertical Blur可以在Compute Shader中利用LDS一次Dispatch完成,从而节省DrawCall的消耗。
首先还是得先Downsample,4个像素Down Sample成一个,在第一次Downsample的时候可以顺便把采样的四个像素拷贝到Color Pyramid Mip0中(不需要Blur)
管线调用
public int RenderColorGaussianPyramidCS(CommandBuffer cmd, Vector2Int size, Texture source, RenderTexture destination)
{...int finalTargetMipWidth = destination.width;int finalTargetMipHeight = destination.height;var cs = m_ColorPyramidCS;bool isFirstLoop = true;bool switchFlag = false;// Note: smaller mips are excluded as we don't need them and the gaussian compute works// on 8x8 blockswhile (srcMipWidth >= 8 || srcMipHeight >= 8){int dstMipWidth = Mathf.Max(1, srcMipWidth >> 1);int dstMipHeight = Mathf.Max(1, srcMipHeight >> 1);RenderTargetIdentifier sourceRTI, destinationRTI;if (isFirstLoop){sourceRTI = source;destinationRTI = m_TempDownsamplePyramid0[rtIndex];//启用关键字Copy Mip0//第一次Loop的时候DownSample之余,顺便把source的Mip0 Copy到ColorPyramid Mip0cmd.EnableKeyword(cs, this.copyMip0);cmd.SetComputeTextureParam(cs, m_ColorPyramidDownSampleKernel, "_Mip0", destination, 0);}else{//Ping Pong Downsampleif (switchFlag){sourceRTI = m_TempDownsamplePyramid1[rtIndex];destinationRTI = m_TempDownsamplePyramid0[rtIndex];}else{sourceRTI = m_TempDownsamplePyramid0[rtIndex];destinationRTI = m_TempDownsamplePyramid1[rtIndex];}switchFlag = !switchFlag;}// Downsample.//this.size[0] = srcMipWidth;this.size[1] = srcMipHeight;cmd.SetComputeVectorParam(cs, ShaderIDs._Size, this.size);cmd.SetComputeTextureParam(cs, m_ColorPyramidDownSampleKernel, ShaderIDs._Source, sourceRTI);cmd.SetComputeTextureParam(cs, m_ColorPyramidDownSampleKernel, ShaderIDs._Destination, destinationRTI);cmd.DispatchCompute(cs, m_ColorPyramidDownSampleKernel, HQUtils.DivRoundUp(dstMipWidth, 8), HQUtils.DivRoundUp(dstMipHeight, 8), 1);if (isFirstLoop){cmd.DisableKeyword(cs, this.copyMip0);isFirstLoop = false;}//Blur.//Blur完直接输出到ColorPyramid对应的Mipthis.size[0] = dstMipWidth;this.size[1] = dstMipHeight;cmd.SetComputeVectorParam(cs, ShaderIDs._Size, this.size);cmd.SetComputeTextureParam(cs, m_ColorPyramidGaussianKernel, ShaderIDs._Source, destinationRTI);cmd.SetComputeTextureParam(cs, m_ColorPyramidGaussianKernel, ShaderIDs._Destination, destination, srcMipLevel + 1);cmd.DispatchCompute(cs, m_ColorPyramidGaussianKernel, HQUtils.DivRoundUp(dstMipWidth, 8), HQUtils.DivRoundUp(dstMipHeight, 8), 1);srcMipLevel++;srcMipWidth = srcMipWidth >> 1;srcMipHeight = srcMipHeight >> 1;finalTargetMipWidth = finalTargetMipWidth >> 1;finalTargetMipHeight = finalTargetMipHeight >> 1;}return srcMipLevel + 1;
}
DownSample Compute Shader
COPY_MIP_0的Keyword控制是否拷贝到Mip0中
#if COPY_MIP_0TEXTURE2D(_Source);RW_TEXTURE2D(float4, _Mip0);
#else
RW_TEXTURE2D(float4, _Source);
#endifRW_TEXTURE2D(float4, _Destination);SamplerState sampler_LinearClamp;CBUFFER_START(cb)
float4 _Size; // x: src width, y: src height, zw: unused
CBUFFER_END[numthreads(KERNEL_SIZE, KERNEL_SIZE, 1)]
void MAIN_DOWNSAMPLE(uint3 dispatchThreadId : SV_DispatchThreadID)
{uint2 offset = dispatchThreadId.xy * 2u;uint2 size = uint2(_Size.xy) - 1u;uint2 c00 = min(offset + uint2(0u, 0u), size);uint2 c10 = min(offset + uint2(1u, 0u), size);uint2 c11 = min(offset + uint2(1u, 1u), size);uint2 c01 = min(offset + uint2(0u, 1u), size);float4 p00 = _Source[(c00)];float4 p10 = _Source[(c10)];float4 p11 = _Source[(c11)];float4 p01 = _Source[(c01)];#if COPY_MIP_0_Mip0[(c00)] = p00;_Mip0[(c10)] = p10;_Mip0[(c11)] = p11;_Mip0[(c01)] = p01;#endif_Destination[(dispatchThreadId.xy)] = (p00 + p01 + p11 + p10) * 0.25;
}Downsample完之后就可以对DownSample的结果进行Blur处理
Gaussian Blur
Store Pixel Into LDS
这里的threadUL的命名其实有点误导,因为unity (0,0)是左下角。这里应该是LL才对,但是影响不大。
可以看到这里先读取了四个像素threadUL上,左,斜上角的四个像素。
读取完之后将float32转成16位,通过位运算将两个像素的r,g,b,a分别塞进gs_cacheR/gs_cacheG/gs_cacheB/gs_cacheA的LDS中。
// 16x16 pixels with an 8x8 center that we will be blurring writing out. Each uint is two color
// channels packed together.
// The reason for separating channels is to reduce bank conflicts in the local data memory
// controller. A large stride will cause more threads to collide on the same memory bank.
groupshared uint gs_cacheR[128];
groupshared uint gs_cacheG[128];
groupshared uint gs_cacheB[128];
groupshared uint gs_cacheA[128];void Store2Pixels(uint index, float4 pixel1, float4 pixel2)
{gs_cacheR[index] = f32tof16(pixel1.r) | f32tof16(pixel2.r) << 16;gs_cacheG[index] = f32tof16(pixel1.g) | f32tof16(pixel2.g) << 16;gs_cacheB[index] = f32tof16(pixel1.b) | f32tof16(pixel2.b) << 16;gs_cacheA[index] = f32tof16(pixel1.a) | f32tof16(pixel2.a) << 16;
}//KERNEL_SIZE=8
[numthreads(KERNEL_SIZE, KERNEL_SIZE, 1)]
void MAIN_GAUSSIAN(uint2 groupId : SV_GroupID, uint2 groupThreadId : SV_GroupThreadID, uint3 dispatchThreadId : SV_DispatchThreadID)
{// Upper-left pixel coordinate of quad that this thread will read//kernel = 8 groupId<<3为当前group的左下角//groupThreadId<<1即groupThreadId*2//-4即每个Group的边界Padding4个像素  读取Source像素Tile的大小:8+4+4=16//16*16/2=128(LDS的容量)int2 threadUL = (groupThreadId << 1) + (groupId << 3) - 4;//边界控制//当groupThreadId.y=0时,groupThreadId.x = 0,1,2依旧读取左下角(0,0)uint2 uthreadUL = uint2(max(0, threadUL));uint2 size = uint2(_Size.xy) - 1u;float4 p00 = _Source[(min(uthreadUL + uint2(0u, 0u), size))];float4 p10 = _Source[(min(uthreadUL + uint2(1u, 0u), size))];float4 p11 = _Source[(min(uthreadUL + uint2(1u, 1u), size))];float4 p01 = _Source[(min(uthreadUL + uint2(0u, 1u), size))];// Store the 4 downsampled pixels in LDSuint destIdx = groupThreadId.x + (groupThreadId.y << 4u);Store2Pixels(destIdx, p00, p10);Store2Pixels(destIdx + 8u, p01, p11);//同步LDSGroupMemoryBarrierWithGroupSync();...
}
LDS映射关系(写得太抽象了,建议自己理一遍Index)
上面的LDS映射关系(destIdx):
2*2的采样Quad中
p00, p10(offsetY=0)存储在destIdx中,而p01, p11(offsetY=1)存储在destIdx+8的位置中。
也就是说在LDS中:
groupThreadId.y=0:(边界像素)
(destIdx=0,1....,7存储Tile[8*8] y=0的像素)
(destIdx=8,9....,15存储Tile y=1的像素)
groupThreadId.y=1:(边界像素)
(destIdx=16,....,23存储Tile y=0的像素)
(destIdx=24,....,31存储Tile y=1的像素)
groupThreadId.y=2:(边界像素)
(destIdx=32,....,39存储Tile y=0的像素)
(destIdx=40,....,47存储Tile y=1的像素)
groupThreadId.y=3:
(destIdx=48,....,55存储Tile y=2的像素)
(destIdx=56,....,63存储Tile y=3的像素)
groupThreadId.y=4:
(destIdx=64,....,71存储Tile y=3的像素)
(destIdx=72,....,79存储Tile y=4的像素)
...
groupThreadId.y=7:(min(uthreadUL + uint2(0u, 0u), size)限制在RT的size之内。
(destIdx=112,....,119存储Tile y=6的像素)
(destIdx=120,....,127存储Tile y=7的像素)
对于groupThreadId.x来说也同样有类似的边界限制。
groupThreadId.x=0/1/2依旧以Tile中的(0,0)像素作为左下角进行采样
BlurHorizontally
水平方向上的模糊计算,读取LDS上的像素,计算高斯模糊的结果,然后把Blur结果存在Gaussian Kernel中心点(e)对应LDS中Index位置上[outIndex]。
leftMostIndex为读取LDS的起始Index。
一共读取5次LDS,获得10个像素,以9个像素计算一次Blur。
ex:
groupThreadId.y=0
groupThreadId.x:0~3 BlurHorizontally tile.y=0的像素 保存Blur的结果在LDS中,Index范围为(0~7)
groupThreadId.x:4~7 BlurHorizontally tile.y=1的像素 Index范围为(8~15)
以此类推
//根据Gaussian曲线上的值近似计算
float4 BlurPixels(float4 a, float4 b, float4 c, float4 d, float4 e, float4 f, float4 g, float4 h, float4 i)
{return 0.27343750 * (e)+ 0.21875000 * (d + f)+ 0.10937500 * (c + g)+ 0.03125000 * (b + h)+ 0.00390625 * (a + i);
}void Load2Pixels(uint index, out float4 pixel1, out float4 pixel2)
{uint rr = gs_cacheR[index];uint gg = gs_cacheG[index];uint bb = gs_cacheB[index];uint aa = gs_cacheA[index];pixel1 = float4(f16tof32(rr), f16tof32(gg), f16tof32(bb), f16tof32(aa));pixel2 = float4(f16tof32(rr >> 16), f16tof32(gg >> 16), f16tof32(bb >> 16), f16tof32(aa >> 16));
}void Store1Pixel(uint index, float4 pixel)
{gs_cacheR[index] = asuint(pixel.r);gs_cacheG[index] = asuint(pixel.g);gs_cacheB[index] = asuint(pixel.b);gs_cacheA[index] = asuint(pixel.a);
}// Blur two pixels horizontally.  This reduces LDS reads and pixel unpacking.
void BlurHorizontally(uint outIndex, uint leftMostIndex)
{float4 s0, s1, s2, s3, s4, s5, s6, s7, s8, s9;Load2Pixels(leftMostIndex + 0, s0, s1);Load2Pixels(leftMostIndex + 1, s2, s3);Load2Pixels(leftMostIndex + 2, s4, s5);Load2Pixels(leftMostIndex + 3, s6, s7);Load2Pixels(leftMostIndex + 4, s8, s9);Store1Pixel(outIndex, BlurPixels(s0, s1, s2, s3, s4, s5, s6, s7, s8));Store1Pixel(outIndex + 1, BlurPixels(s1, s2, s3, s4, s5, s6, s7, s8, s9));
}[numthreads(KERNEL_SIZE, KERNEL_SIZE, 1)]
void MAIN_GAUSSIAN(uint2 groupId : SV_GroupID, uint2 groupThreadId : SV_GroupThreadID, uint3 dispatchThreadId : SV_DispatchThreadID)
{...// Horizontally blur the pixels in LDSuint row = groupThreadId.y << 4u;BlurHorizontally(row + (groupThreadId.x << 1u), row + groupThreadId.x + (groupThreadId.x & 4u));GroupMemoryBarrierWithGroupSync();...
}
BlurVertically
竖直方向上Blur就用刚刚水平方向上Blur完的LDS继续模糊即可。
以s4的像素作为中心点进行模糊,并把模糊的结果写入到像素对应的位置上。
float4 BlurPixels(float4 a, float4 b, float4 c, float4 d, float4 e, float4 f, float4 g, float4 h, float4 i)
{return 0.27343750 * (e)+ 0.21875000 * (d + f)+ 0.10937500 * (c + g)+ 0.03125000 * (b + h)+ 0.00390625 * (a + i);
}void Load1Pixel(uint index, out float4 pixel)
{pixel = asfloat(uint4(gs_cacheR[index], gs_cacheG[index], gs_cacheB[index], gs_cacheA[index]));
}//以s4的像素作为中心点进行模糊
void BlurVertically(uint2 pixelCoord, uint topMostIndex)
{float4 s0, s1, s2, s3, s4, s5, s6, s7, s8;Load1Pixel(topMostIndex, s0);Load1Pixel(topMostIndex + 8, s1);Load1Pixel(topMostIndex + 16, s2);Load1Pixel(topMostIndex + 24, s3);Load1Pixel(topMostIndex + 32, s4);Load1Pixel(topMostIndex + 40, s5);Load1Pixel(topMostIndex + 48, s6);Load1Pixel(topMostIndex + 56, s7);Load1Pixel(topMostIndex + 64, s8);float4 blurred = BlurPixels(s0, s1, s2, s3, s4, s5, s6, s7, s8);// Write to the final target_Destination[(pixelCoord)] = blurred;
}[numthreads(KERNEL_SIZE, KERNEL_SIZE, 1)]
void MAIN_GAUSSIAN(uint2 groupId : SV_GroupID, uint2 groupThreadId : SV_GroupThreadID, uint3 dispatchThreadId : SV_DispatchThreadID)
{...// Horizontally blur the pixels in LDSuint row = groupThreadId.y << 4u;BlurHorizontally(row + (groupThreadId.x << 1u), row + groupThreadId.x + (groupThreadId.x & 4u));GroupMemoryBarrierWithGroupSync();// Vertically blur the pixels in LDS and write the result to memory//(groupThreadId.y << 3u) + groupThreadId.x为当前线程对应像素在LDS中的Index。存放线程对应像素HorizontallyBlur后的结果。BlurVertically(dispatchThreadId.xy, (groupThreadId.y << 3u) + groupThreadId.x);
}
Copy Mip 0
在Copy Mip 0上面,除了可以用上面提到的第一次DownSample时拷贝的方式之外,还能够用Cmd.CopyTexture的方式。
public int RenderColorGaussianPyramidCS(CommandBuffer cmd, Vector2Int size, Texture source, RenderTexture destination)
{...// Copies src mip0 to dst mip0cmd.CopyTexture(source, 0, 0, 0, 0, size.x, size.y, destination, 0, 0, 0, 0);int finalTargetMipWidth = destination.width;int finalTargetMipHeight = destination.height;var cs = m_ColorPyramidCS;bool isFirstLoop = true;bool switchFlag = false;// Note: smaller mips are excluded as we don't need them and the gaussian compute works// on 8x8 blockswhile (srcMipWidth >= 8 || srcMipHeight >= 8){int dstMipWidth = Mathf.Max(1, srcMipWidth >> 1);int dstMipHeight = Mathf.Max(1, srcMipHeight >> 1);// Downsample.RenderTargetIdentifier sourceRTI, destinationRTI;if (isFirstLoop){sourceRTI = source;destinationRTI = m_TempDownsamplePyramid0[rtIndex];// cmd.EnableKeyword(cs, this.copyMip0);// cmd.SetComputeTextureParam(cs, m_ColorPyramidDownSampleKernel, "_Mip0", destination, 0);}else{if (switchFlag){sourceRTI = m_TempDownsamplePyramid1[rtIndex];destinationRTI = m_TempDownsamplePyramid0[rtIndex];}else{sourceRTI = m_TempDownsamplePyramid0[rtIndex];destinationRTI = m_TempDownsamplePyramid1[rtIndex];}switchFlag = !switchFlag;}this.size[0] = srcMipWidth;this.size[1] = srcMipHeight;cmd.SetComputeVectorParam(cs, ShaderIDs._Size, this.size);cmd.SetComputeTextureParam(cs, m_ColorPyramidDownSampleKernel, ShaderIDs._Source, sourceRTI);cmd.SetComputeTextureParam(cs, m_ColorPyramidDownSampleKernel, ShaderIDs._Destination, destinationRTI);cmd.DispatchCompute(cs, m_ColorPyramidDownSampleKernel, HQUtils.DivRoundUp(dstMipWidth, 8), HQUtils.DivRoundUp(dstMipHeight, 8), 1);if (isFirstLoop){// cmd.DisableKeyword(cs, this.copyMip0);isFirstLoop = false;}this.size[0] = dstMipWidth;this.size[1] = dstMipHeight;cmd.SetComputeVectorParam(cs, ShaderIDs._Size, this.size);cmd.SetComputeTextureParam(cs, m_ColorPyramidGaussianKernel, ShaderIDs._Source, destinationRTI);cmd.SetComputeTextureParam(cs, m_ColorPyramidGaussianKernel, ShaderIDs._Destination, destination, srcMipLevel + 1);cmd.DispatchCompute(cs, m_ColorPyramidGaussianKernel, HQUtils.DivRoundUp(dstMipWidth, 8), HQUtils.DivRoundUp(dstMipHeight, 8), 1);srcMipLevel++;srcMipWidth = srcMipWidth >> 1;srcMipHeight = srcMipHeight >> 1;finalTargetMipWidth = finalTargetMipWidth >> 1;finalTargetMipHeight = finalTargetMipHeight >> 1;}return srcMipLevel + 1;
}
性能对比
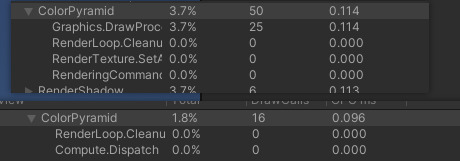
上面是HDRP原来用PixelShader 生成ColorPyramid的耗时
下面是使用cmd.CopyTexture+Compute Shader Blur生成ColorPyramid的耗时

这个是不用cmd.CopyTexture生成ColorPyramid的耗时
测试用的显卡是RTX3080,一通操作下来减少DrawCall的调用优化了大概0.01ms左右,可以看到相比于不使用Cmd.CopyTexture的方式还能够提升0.004ms左右。以我目前贫瘠的硬件知识,我猜测通过Cmd.CopyTexture的方式减轻了Compute pipeline的压力,从而有所提升。